How to add a navigation menu in WordPress (The best guide)
WordPress navigation menu is one of the most important elements that will also include other primary areas of your site. They offer the fastest method for your user to find out your content and navigate your site. Consequently, having poorly organized or unwieldy menus can be harmful for your user experience and, in turn, damage your search engine rankings. In this post, you’ll learn what a navigation menu is and how you can add one to your WordPress site.
What is a Navigation Menu?
A navigation menu is a list of a links pointing to crucial areas of a WordPress website. They are usually showcased as a horizontal bar of links at the top of every page on a website.
Navigation menus provides your site structure and support users to find what they’re looking for. Here’s how the navigation menu looks on Arrowtheme:

WordPress makes it really easy to add menus and sub-menus. You can add links to your most important pages such as categories or blog posts, and even custom links including social media profile.
The exact location of your menu will base on your WordPress theme. Most themes will comes with several options, so you can generate different menus that can be showcased in different places.
For example, most WordPress themes provide a primary menu that showcases on the top. Some themes may comes witj a secondary menu, a footer menu, or a mobile navigation menu as well.
Basically, as a default, you do not need to install anything to generate a simple menu for your WordPress website. Because it might not be the most awesome solution or the one with the most helpful customization options. But the WordPress menus work very well to clearly direct users through your website and where they seem to show positive with a default theme provided.
How to add a navigation menu in WordPress
Before you start including the navigation product, you need to first generate it. Let’s follow the below steps for the same of creating the navigation menu
Create Your Navigation Menu
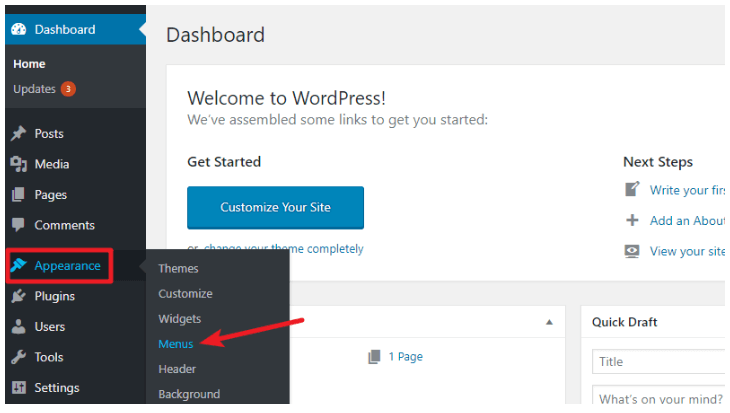
- Move to your WordPress dashboard and click on the Appearance>>Menus.
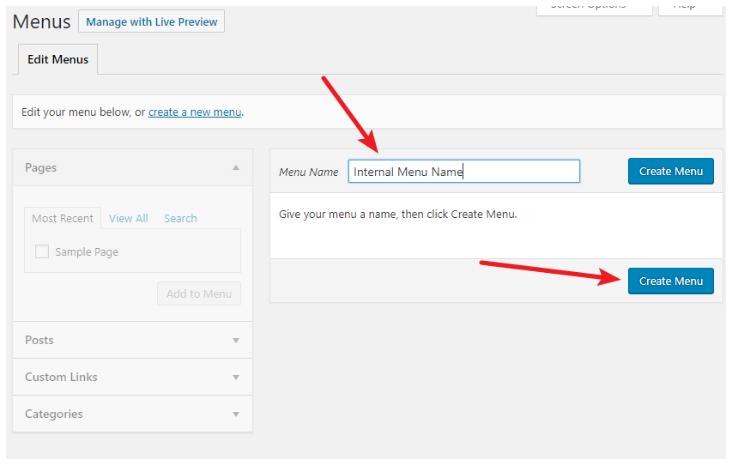
- Now, you have to enter your menu name and then click on Create Menu.
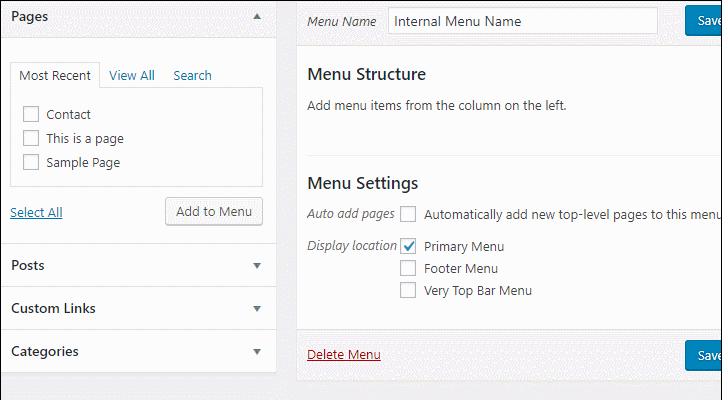
- After generating your menu, WordPress will show you a Menu Settings section. In this Menu Settings, you can select a Display location. At this step, you can insert your navigation menu on your site.
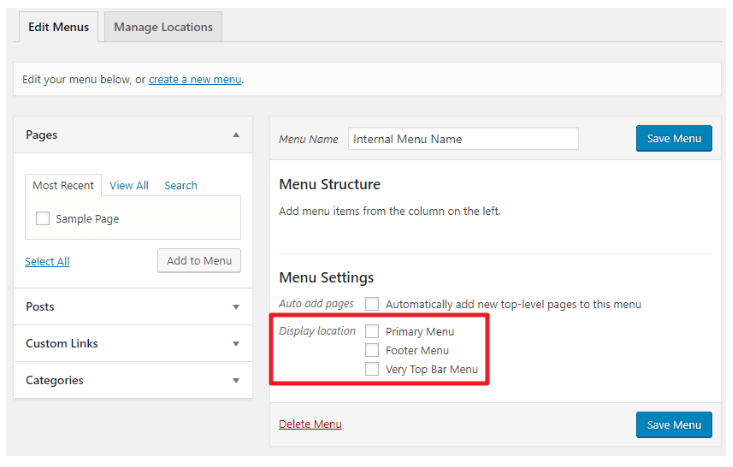
- When you find the location to assign the menu, check that box & click Save Menu button.
Now you have successfully created a navigation menu. Next step, you need to add some items to this navigation menu. This is the first step we do while we add a Navigation menu.
Add Items To Your Navigation Menu
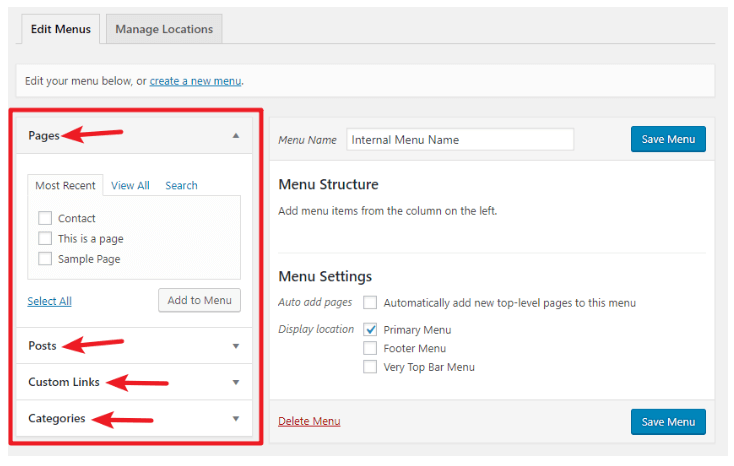
When you add an item to your navigation menu, you’ll use the sidebar on the left:
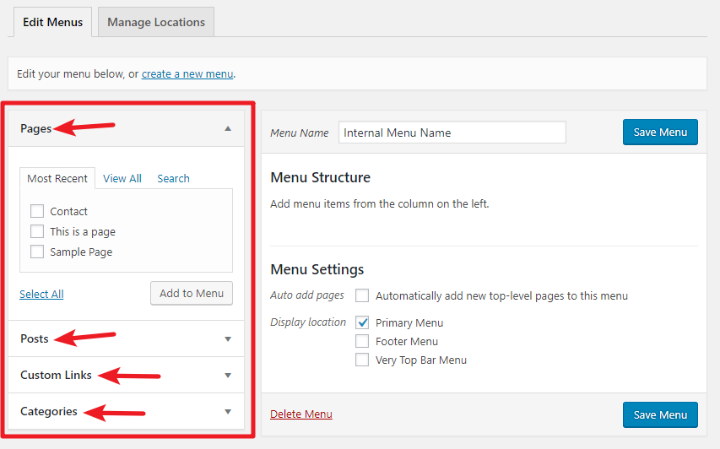
In that sidebar, you need to notice that there are several sections for:
- Pages – this allows you add links to any of your published pages.
- Posts – this enables you add links to any of your published posts.
- Custom Links – this enables you add custom links. These could be internal links or external links.
- Categories – this enables you to add links to different categories on your blog.
Keep in mind that depending on the specific theme and/or plugins that you’re using, you might also see additional sections with menu items that are specific to your website. To add a link to your Contact page, all thing you need to do is:
- Check the box for your Contact page
- Click Add to Menu
When you click Add to Menu, you should see it showcase under Menu Structure on the right side of the interface:
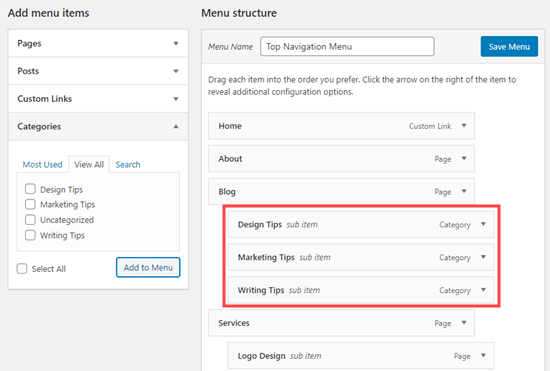
Adding Categories to WordPress Menus
If you’re using WordPress for a blog, then you may need to add your blog categories as a drop-down in your WordPress menu.
You can easily include categories to your menu by clicking the Categories tab on the left side of the Menus screen. You may also need to click the ‘View All’ tab to see all your categories.
Simply choose the categories you need to add to the menu, and then click the ‘Add to Menu’ button.

The categories will showcase as regular menu items at the bottom of your navigate menu. Moreover, you can drag and drop them into position.
Delete Menu Items
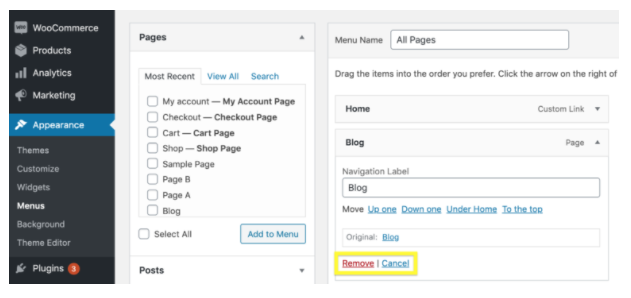
When you want to delete menu items, the process is just as simple.
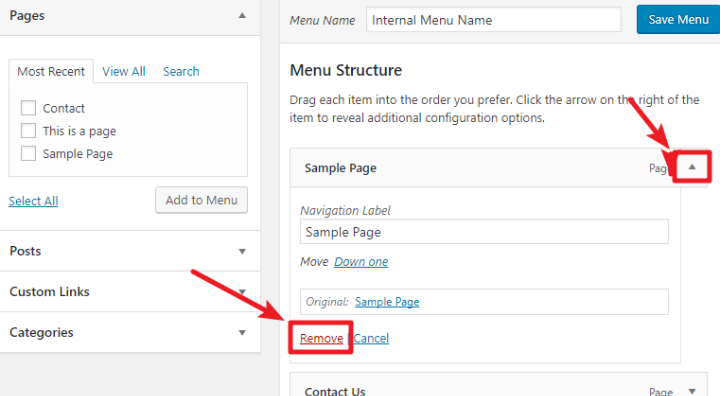
Move on the Appearance > Menus page, click the menu item you need to remove and find the red Remove link below the Navigation Label field.
Click this link, then save the menu by the Save Menu button.
Remove A Navigation Menu Item
To remove an item from your menu:
- Click the Down Arrow icon to the right of the item
- Choose Remove
Conclusion
When it comes to building a great user experience, easy-to-follow navigation should be one of your highest priorities. If you still find it difficult to follow this guide or any further questions regarding WordPress, then you can get in touch with experts for any free support.
Besides, whether you are looking to build robust WordPress websites, redesign existing website, or seeking a professional maintenance & Support service, our WordPress Development Packages provide you with a team of experts who are ready to help you achieve your business goals.
Especially, our packages are ready to provide you with 30 % OFF !!! You can reach us at Here. We’ll be happy to provide you with a free consultation.