5 easy ways to leverage browser caching wordpress with or without plugin
Leverage Browser Caching helps you to improve the web performance testing score in WordPress website. By fixing the leverage browser caching warning, you’ll quickly speed up your WordPress site and deliver a better experience to your website visitors. In this article, we’ll show you 5 easy way to easily fix leverage browser caching warning in WordPress.
What is the Leverage Browser Caching Warning?
The Leverage Browser Caching warning is one of many ‘diagnostics’ Google PageSpeed used to return as a suggestion for enhancing your score like the following image:

In Version 5 of Google PageSpeed Insights, this message was changed into the “Serve static assets with an efficient cache policy” warning:
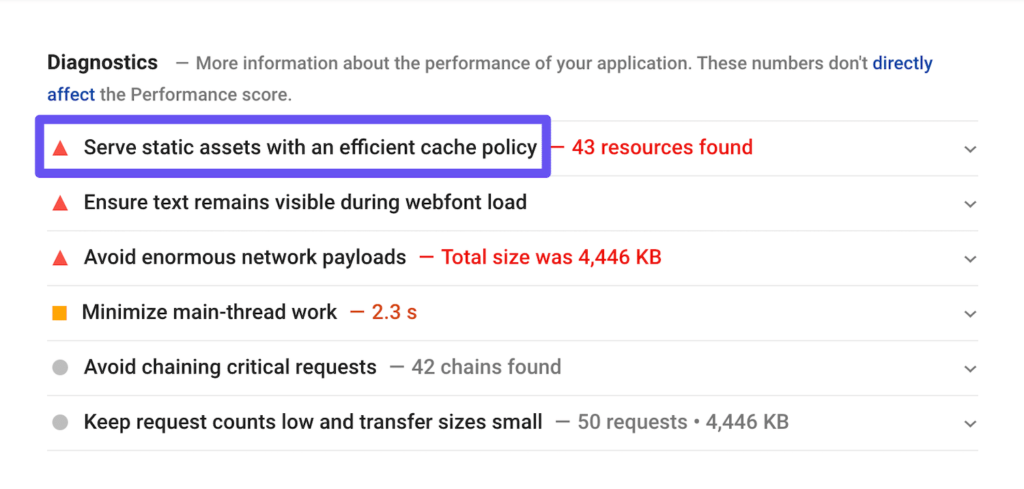
Although the change in language and appearance, the method to solve these warnings is the same. Google recommended using browser caching to decrease page loading times and boost performance. In a nutshell, caching is when users’ browsers save static copies of your website’s pages. Then, on subsequent visits, this content can be re-loaded faster because the browser doesn’t have to contact your website’s server in order to access the requested resources.
However, every cached resource require a specified expiration period. This shows browsers when content on your website has become outdated, so it can replace its cached copy with an updated version.
When you’re seeing the “Leverage Browser Caching” warning in your performance test results, that means you encountered one of two cases
- The Cache-Control or Expires headers are missing from your site’s server or of a third-party.
- The necessary headers are showcased, but the expiration period is very short and therefore doesn’t have much impact on performance.
Methods to fix the leverage browser caching warning in WordPress
There are a few different methods you might go about solving the Leverage Browser Caching warning in WordPress, relying on what’s causing it. Here are some solutions you can try.
Method 1: Leverage Browser Caching in WordPress with a Plugin
The easiest method to leverage browser caching is to do it with a WordPress plugin such as:
Cache Enabler – WordPress Cache is a 4.5+ Star Rating plugin. Apart from, browser caching, this module comes with some unique features to speed up your WordPress site
- First of all, Install and Activate the Cache Enabler plugin.
- Move to the plugin setting page.
- Click to Enable Leverage Browser Caching.
- And, that’s it.
Method 2: Leverage Browser Caching via htaccess (without plugin)
Follow the step below to Leverage Browser Caching in WordPress via .htaccess:
- Move to WordPress Dashboard/cPanel of your website.
- Open .htaccess file (or config file).
- Paste the code given below in .htaccess file of the WordPress site.
- Save changes and you’re done.
- Test your site with PageSpeed tools again to view the changes.
1. Add Expire Headers (Apache)
# TN - START EXPIRES CACHE
ExpiresActive On
ExpiresByType text/css "access 1 month"
ExpiresByType text/html "access 1 month"
ExpiresByType image/gif "access 1 year"
ExpiresByType image/png "access 1 year"
ExpiresByType image/jpg "access 1 year"
ExpiresByType image/jpeg "access 1 year"
ExpiresByType image/svg "access 1 year"
ExpiresByType image/x-icon "access 1 year"
ExpiresByType application/pdf "access 1 month"
ExpiresByType application/xhtml-xml "access 1 month"
ExpiresByType application/javascript "access 1 month"
ExpiresByType text/x-javascript "access 1 month"
ExpiresByType application/x-shockwave-flash "access 1 month"
ExpiresDefault "access 1 month"
# TN - END EXPIRES CACHE
You also can Add Expire Headers in the WordPress htaccess file with easy. However, we high recommend you to set expiry dates for a year. Less than a month or beyond one year is not high recommended.
Moreover, you can add the Cache-Control Headers below the Expire Headers code in htaccess file.
2. Add Cache-Control Headers (Apache)
# TN - BEGIN Cache-Control Headers
<ifModule mod_headers.c>
<filesMatch "\.(ico|jpeg|jpg|png|gif|swf|pdf|svg)$">
Header set Cache-Control "public"
</filesMatch>
<filesMatch "\.(css)$">
Header set Cache-Control "public"
</filesMatch>
<filesMatch "\.(js)$">
Header set Cache-Control "private"
</filesMatch>
<filesMatch "\.(x?html?|php)$">
Header set Cache-Control "private, must-revalidate"
</filesMatch>
</ifModule>
# TN - END Cache-Control Headers
You can assign timeline in Cache-Control Headers, but it won’t be necessary as you have already set expiry dates for the cached resources.
At last, you need to Turn ETags Off.
3. Turn ETags headers Off (Apache) for Multi-server sites or CDNs
# TN - BEGIN Turn ETags Off
FileETag None
# TN - END Turn ETags Off
Next step, you save your WordPress htaccess file and clear all the cache if you are using a cache plugin.
Now, you have successfully enabled Leverage Browser Caching via htaccess.
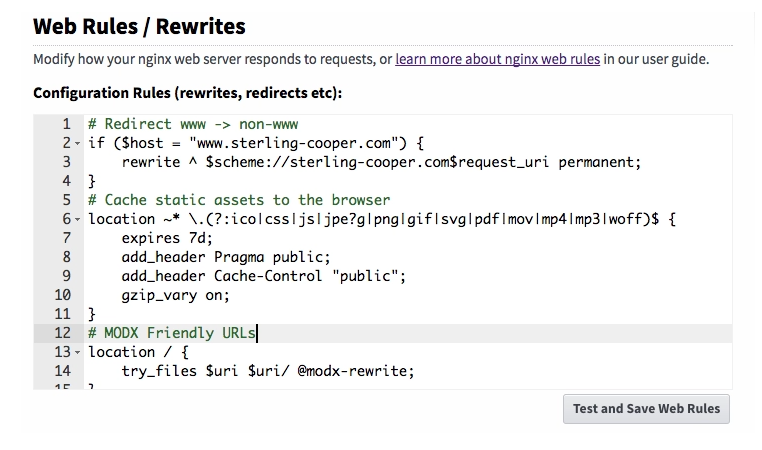
Method 3: Leverage Browser Caching in NGINX
If you are on Nginx server you can Leverage Browser Caching without using a WordPress plugin by using following code in the .conf file.
You can find easily the configuration file at this location… /etc/nginx/sites-enabled/default
1. Add Expires Headers (NGINX)
location ~* \.(jpg|jpeg|png|gif|ico|css|js|pdf|svg)$ {
expires 365d;
}
location ~* \.(pdf|html|swf)$ {
expires 90d;
}
2. Add Cache-Control Headers (NGINX)
location ~* \.(jpg|jpeg|png|gif|ico|css|js|pdf|svg)$ {
expires 90d;
add_header Cache-Control "public, no-transform";
}
If you have multiple site on NGINX Server. We high recommend you to generate a xyz.conf file and follow the above-mentioned code. Save this file in this folder /etc/nginx/sites-available/xyz.conf
Reload Nginx server after editing and you have successfully activated Leverage Browser Caching on NGINX Server.
Method 4: Leverage Browser Caching for Google Analytics
If you are using any WordPress plugin for Google Analytics, you may still get leverage browser caching warning, doesn’t matter you set up everything accurately.
It is because Google Analytics set the default expiry time for only two hours to ensure you get updates as fast as possible.
There are two methods to resolve leverage browser cache warning for Google Analytics.
- Local: You can generate a local copy of analytics.js and/or ga.js (whatever file you are dealing with leverage browser cache). Please note that Google does not recommend this method.
- Plugin: Utlize Complete Analytics Optimization Suite (CAOS) WordPress plugin that hosts your Google Analytics file locally and use wp_cron() to keep it updated.
Method 5: Leverage Browser Caching in Nginx
If your WordPress website is actually using Nginx as its server, you will need a different code, since Nginx does not have an .htaccess file. However, it’s still relatively easy to apply this, because you just need to implement a few edits in the conf file of the server.
You need to use the code below inside of an existing server block in your conf file. This will commonly be in /etc/nginx/sites-enabled/default
server {
    listen       80;
    server_name  localhost;

    location / {
        root   /usr/share/nginx/html;
        index  index.html index.htm;
    }
    location ~*  \.(jpg|jpeg|png|gif|ico|css|js)$ {
        expires 365d;
    }
    location ~*  \.(pdf)$ {
        expires 30d;
    }
}
Add Cache-Control Headers for Nginx
location ~* \.(jpg|jpeg|png|gif|ico|css|js)$ {
expires 90d;
add_header Cache-Control "public, no-transform";
}
You can deduce from the command line above, I’ve setting the expiry location for image files to 1 year or 365 days, whilst I set PDFs to expire after 30 days. You can include more file extensions to customize the expiration making it different for other filetypes.
Any file types which are added will be cached appropriately
Conclusion
We hope this article helped you to easily fix leverage browser caching warning in WordPress. Besides, whether you are looking to build robust WordPress websites, redesign existing website, or seeking a professional maintenance & Support service, our WordPress Development Packages provide you with a team of experts who are ready to help you achieve your business goals.
Especially, our packages are ready to provide you with 30 % OFF !!! You can reach us at Here. We’ll be happy to provide you with a free consultation.