How to make wordpress site private until launch with the easy way
WordPress platform makes it easy to hide your webpage from search engines or the general public. This is true whether you want to make a site private during development or on a more permanent basis. In this guide, we’ll show you how to make WordPress site private until launch with the easy way.
Why do you need to make WordPress site private?
Many owners store want to keep a newly launched website secret until it is ready to go live. This allows the user to populate a new platform with material and troubleshoot any problems without the need for an audience. The admin store can only make his website available after adding material and finalizing the theme.
Consider a website created for family members or for use inside a small business. This types of websites include material that is only meant for a small number of people. In cases like this, making a WordPress account private forever is best suitable acceptable and frequently recommended. Decide if you want to hide any or all of your site before you start. The right solution can be determined by your needs.
Also read: How to unpublish a wordpress site ( or WordPress Pages, Posts)
How to make WordPress site Private
Method 1. Make WordPress Site Private without plugin
This might be one of the easiest methods to private your WordPress Site. In this way, we will modify the default settings of WordPress to have the desired result. Here are the some steps you need to follow:
- Login to WordPress Dashboard.
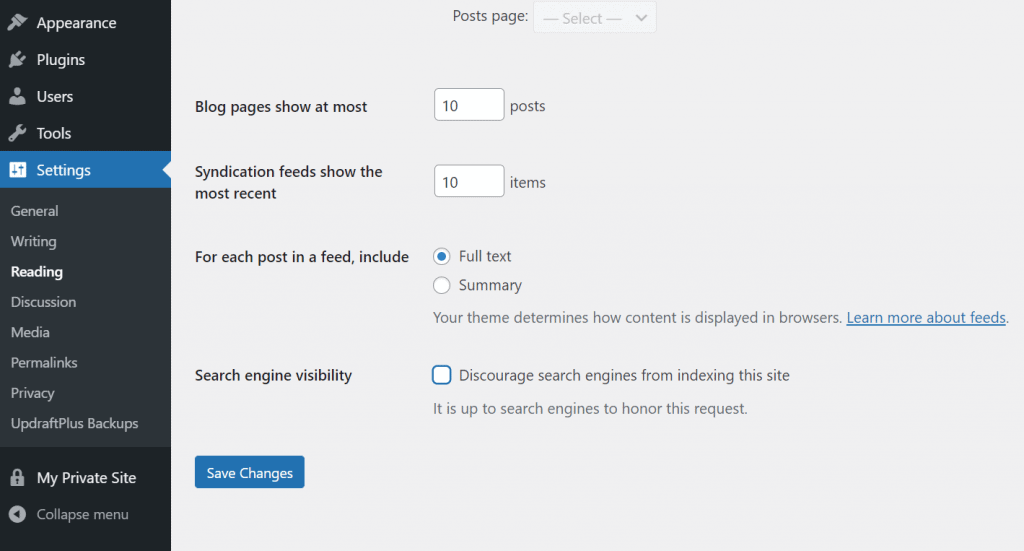
- Now move to Settings >> Reading.
- At this step, you will find an option “Discourage search engines from indexing this site” Just check it.

- You click “Save Changes.” ( This way will stop the search engine indexing which will hide your site from search engines.)
Method 2: Make WordPress Site Private Using a free Plugin
In this way, you will need to use a Privatization Plugin and then modify some settings. You can install a free module like My Private Site to prevent users from the outside world. With this method, anyone who visits your site without an account will be directed to the WordPress login screen.

If you set your website to private, search engines won’t be able to find your website. You can follow steps below to install this plugin:
- Click on Plugins, then move to Add New. Find the My Private Site plugin, install and activate it.
- Move to Settings -> Private Site.
- Click the Private Site option under the Make Private Site section.

- Press Save Changes and you’re done!
Also, you can add other users to access your site too. You need to add them as administrators, though. To add new users, simply you just go to Users, and then Add New. Fill in the form about the new user.
Ensure to set the role as Administrator. Click Add New User when you are done.

How to make an Individual Post Private
In some case you only want to keep most of the content on your website freely visible to visitors, but there’s an individual post, video, podcast, or photo that you need to keep private.
There are many reasons why webmaster need to make an individual post private. For example, you’re a teacher and you want to share materials only with your students. Or maybe you just want to share some private thoughts that you don’t want the entire internet to discuss.
If you want to make one (or more) of your posts private but not the entire blog, follow these steps below:
Make a previously published public post private
If you’ve already composed an article and it got published, you can’t protect it from certain archives and web scrapers. But you can prevent visitors from accessing it in the future.
- Go to your dashboard, choose Posts and then click on All Posts.
- At this step, you’ll see a list of all of your posts. For the one that you need to make private, click on Quick Edit.
- From there, look for the word Visibility and change the settings to private. You can select to make the post only visible to you (as well as anyone else who is an admin store or editor of your blog) or pick a password.
Write a private post
- If you’re writing a brand new post and want to set it private, see in the upper right-hand corner of the screen.
- That’s where you’ll see publishing options where it says Visibility. Choose “private” and then decide whether or not to add a password.
Keep in mind that you do NOT have to add a password to make a post private. If a post is private but does not have a password, search engines will not index it and only you and any other webmaster of your blog will can see it. Posts that are private and have a password can be seen by anyone who has the password.
Wrapping Up
So these were the some easiest methods to make wordpress site private until launch. Arrowtheme hopes you will encounter no issues while display a category page in WordPress.
Besides, whether you are looking to build robust ecommerce websites, redesign existing websites, or seeking a professional maintenance & Support service, our WooCommerce Development Packages provide you with a team of experts who are ready to help you achieve your business goals. Especially, you can get up to 30% off for all of your WordPress services.
You can reach us at Here. We’ll be happy to provide you with a free consultation


