How To Add/Remove Sales Channel Shopify: Step-by-step
In case you are running an online store on Shopify platform, Sales channel shopify is one of the most important things you need to know. Thanks to it, you can easily boost sales and gain higher profits effectively with ease. If you don’t know ways to add as well as Sales Channel Shopify, this blog is for you. Now, let’s explore several simple steps to do that with Arrowtheme right now!
Available Sales Channel Shopify
1. Online Store
Checkout and sell through your online store. A Shopify-hosted domain with a myshopify.com address is included in your Shopify subscription package. You can create your own domain if you wish.
2. Facebook
Coming to the second sales channel Shopify – Facebook. From the Shop tab on your store’s Facebook page, you may post and sell your products.

3. Amazon
In one place, you can manage your Amazon listings and Shopify products.
4. Buy Button
By embedding buy buttons that connect to your Shopify checkout, you may sell from your own website or blog (including WordPress and Squarespace).
5. Messenger
Customers may buy straight from you, you can email order and shipment reminders, and you can reply to client questions. With Shopify Ping, you may leverage the Messenger channel.
6. Instagram
By tagging your products when they show in your Instagram posts, you can sell them.
7. Wholesale channel
In a separate, password-protected storefront, sell your products wholesale to other businesses. Only Shopify Plus plans have access to the wholesale channel. Find out more about selling your products in bulk.
8. Handshake
Retailers can browse your business and wholesale products on the Handshake wholesale marketplace. Then, on Handshake, you may learn more about selling.
Eligibility For Certain Channels
Because of unique eligibility restrictions, you may need to make changes to your store’s settings before you may establish a sales channel. What’s more, in case your ecommerce store isn’t eligible for a sales channel Shopify, the channel will show up in your Shopify admin as Unavailable. Click this channel can’t be added to check why your store isn’t qualified.
In addition, before you start using new sales channels, you must keep in mind to read the terms of service. Specified information in your product listings is required or prohibited by some sales channels, and others require you to ship your clients’ orders within a certain number of days.
How To Add The Sales Channel Shopify On Your Shopify Admin?
How To Add The Sales Channel Shopify On Desktop

Three steps below is the way to add the Sales channel Shopify through desktop.
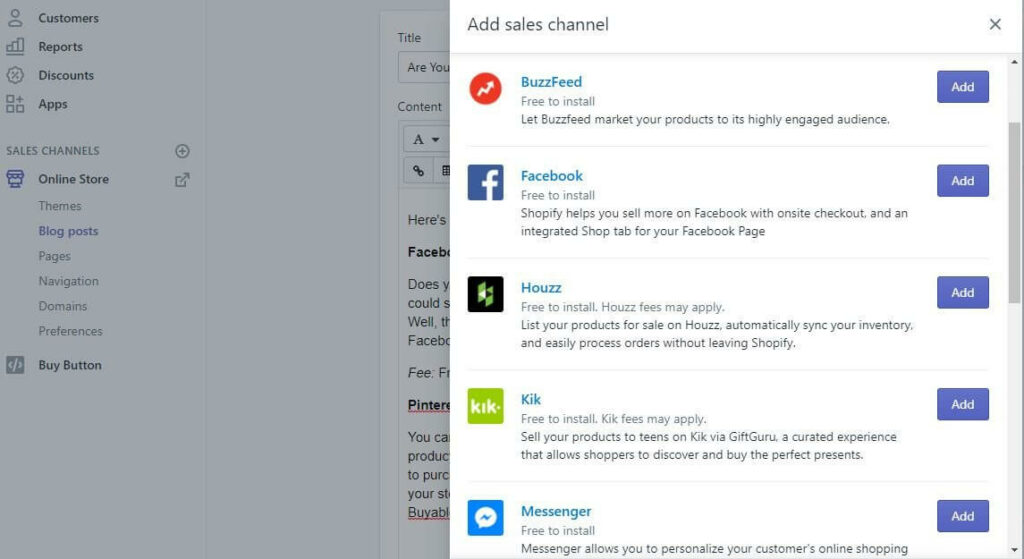
Step 1. Click the + button beside the Sales channels Shopify heading in your Shopify admin.
Step 2. Select the sales channel you wish to add by clicking its name.
As soon as you click the button +, a window called Add sales channels will appear, displaying a list of sales channels from which you may select the name of the sales channel you wish to add.
Step 3. Click on the “Add Channel”
After that, if you want to add any sales channel to your online business, all you need to do is click Add channel.
Then, you’ve done the process of adding Sales channel Shopify on your Shopify admin.
Add Sales channel Shopify iPhone/Android
Step 1. Tap Store on the Shopify app.
Step 2. Click Add channel with iPhone and the + button with Android in the Sales Channel area.
Step 3. Tap the sales channel you want to add on the Add sales channel screen.
Step 4. Finally, add a channel by tapping on it.
How To Remove Sales Channel Shopify On Your Shopify Admin?
Unfortunately, running a variety of online sales platforms can sometimes leave a merchant perplexed. Then, this is the reason why if you don’t want to sell certain products on a specific online channel, you’ll need to know how to remove an online sales channel from your Shopify admin.
In fact, removing sales channel shopify is quite easy, you can refer to it through some simple steps below.
Remove Sales Channel Shopify By Desktop
Step 1. Firstly, choose the sales channel you want to delete
To begin, navigate to your Shopify admin and click on the Settings header. Then, you have to select Sales channels from the Settings menu.
Step 2. Next to the name of the sales channel, click the trash can
After that, in your Shopify admin, go to Sale channels and you’ll find a list of all the existing online sales channels. Then, by clicking the trash can symbol next to the sales channel, you can delete it.

Step 3. Type the reason for the channel’s removal (Optional)
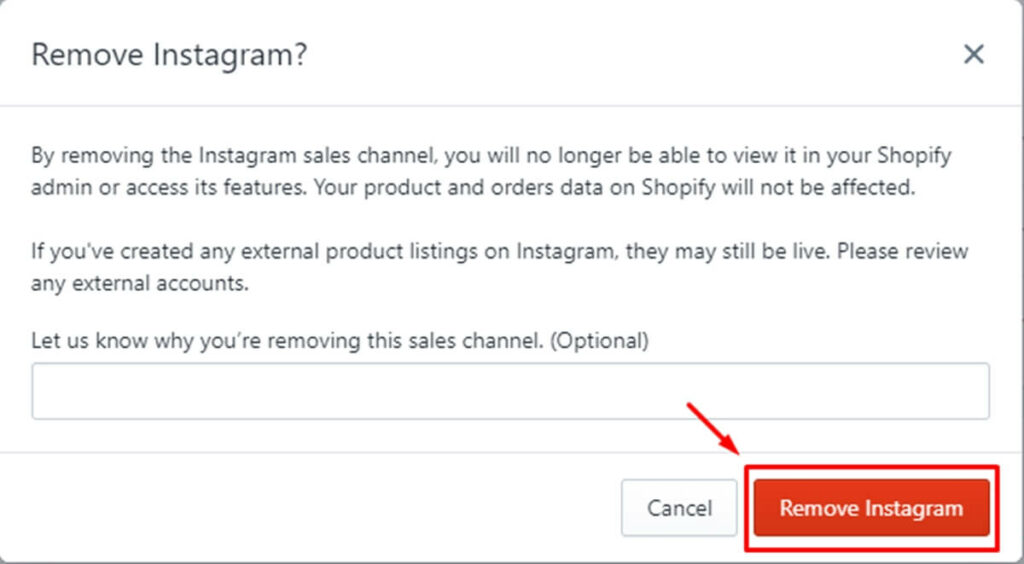
Firstly, a window will display after clicking the trash can symbol beside the sales channel, asking if you wish to eliminate that channel. Besides, if you wish to remove it with an explanation, type it in the field below. However, if you don’t want to enter, just simply skip.
Step 4. Finally, click Remove
The final step is click Remove to confirm, then you’ve completed to delete the sales channel shopify you don’t want.

Remove Sales channel Shopify by iPhone/ Android
Step 1. Tap Store, then Settings, from the Shopify app.
Step 2. Activate the Sales channels.
Step 3. Then, tap the trash can icon next to the sales channel you wish to get rid of:
Shopify App – Remove sales channel iPhone or Android
Step 4. In order to confirm, let’s press the confirm button.
In Conclusion
Overall, as you can see, adding or removing Sales channels shopify is not difficult, just follow a few simple steps Arrowtheme instructs above, then you have successfully added or removed it.
We hope you will get a lot of helpful information when reading this article. If you have any questions, let’s CONTACT US, then we will surely resolve it for you.
Besides, not only this topic, but also any other problems, if you need any help from a reputable Shopify partner, Arrowtheme with our Shopify Website Packages are the most perfect choice for you.
Contact US – ArrowTheme:
– Email: [email protected]
– Facebook: Facebook.com/ArrowThemeTeam
– Website: ArrowTheme.com


