Shopify Checkout Page: The Comprehensive Guide
Checkout is the last step of purchasing on Shopify. It is very important because it decides whether to bring sales to your business or not. However, according to a recent survey, above 60% of customers quit the final step of payment due to a poor checkout page.
Therefore, customizing the Shopify checkout page is necessary for every merchant to gain more sales. So Arrowtheme will instruct you on some basic movements to edit the Shopify Checkout Page.
Insert A Logo On The Shopify Checkout Page
In the first place, every online store has its logo. The logo presents for the brand and reminds customers of your store. So store owner should add the logo on the checkout page to look more professional.
In case you are displaying a banner image, your logo will appear on top of it. Besides, you can move the logo to the right, left, or center of the banner area. Here are 6 steps for you to add the logo.
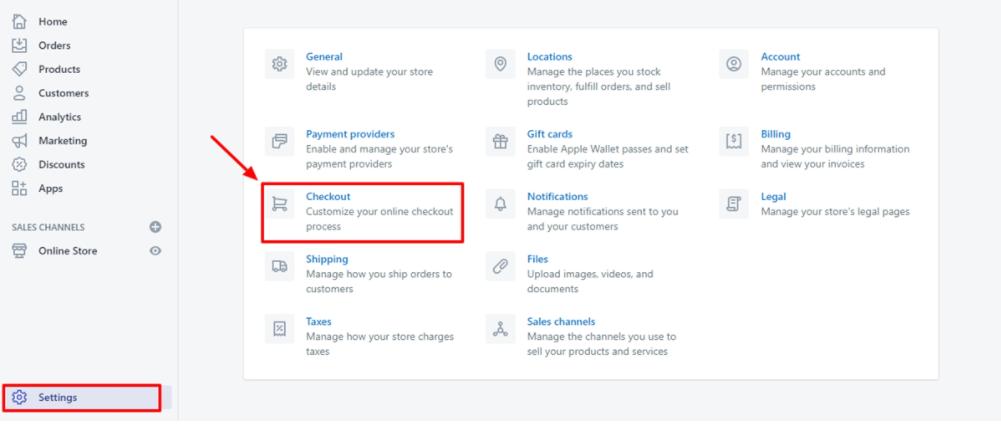
#1. Open Settings > Checkout
After you access the Shopify admin, look at the bottom on the left to click on “Settings”. Then you can see “Checkout” in the first column.
#2. Open Style> Customize Checkout

#3. Find the Logo section then tap on Select images or Upload Images.
#4. Decide the position of the Logo. There are 3 options in the droplist including Left, Center or Right.
#5. Decide the size of the Logo. There are 3 options in the droplist including Large, Medium and Small.
#6. Click Save to finish the process.
For mobile devices, you open Shopify Apps and then go to Store > Settings. After that, follow the same instructions above.
Change The Background Image Of The Banner
A banner appears on the top of the checkout page and it consists of your store name. So selecting an eye-catching background is very important. Also, it is necessary to use an image related to your main products.
For example, if your store sells women’s clothes, you can choose an image that contains the best-seller clothes of your store. To get the best of the banner’s background, you should use the size of 1000 x 400 pixels. After that, follow the instructions below.
#1. Open Settings > Checkout
#2. Open Style > Customize Checkout
#3. Find the Banner section then tap on Select images or Upload Images.
#4. Click Save to finish the process.
For mobile devices, you open Shopify Apps and then go to Store > Settings. After that, follow the same instructions above.
Change The Background Image Or Color Of The Main Content Area
The content area is the place where customers fill in the shipping and payment information. So you should add a suitable image or color for customers to read clearly. It is a note that you can’t add the background image and color at the same time. Read the steps below to change the background or color of the main content area.
#1. Open Settings > Checkout
#2. Open Style > Customize Checkout
#3. Find the Main content area section then select one of 2 choices below
- In the Background color, navigate to the box to display the full options of colors. You can select an available color or enter a hexadecimal code to show another.
- In the Background image, tap on Select Images or Upload Images.
#4. Click Save to finish the process.
For mobile devices, you open Shopify apps and then go to Store > Settings. After that, follow the same instructions above.
Change The Color Of The Form Fields
After changing the color or background images of the main content area, you may want to make changes to the form fields too. You can turn the color of form fields into white or transparent. So customers can see the images of the background. You can implement quickly with these steps quickly.
#1. Open Settings > Checkout
#2. Open Style > Customize Checkout
#3. Find the Main content area section then select one color from the droplist including white and transparent.
#4. Click Save to finish the process.
For mobile devices, you open Shopify Apps and then go to Store > Settings. After that, follow the same instructions above.
Select A Background Image Or Color Of The Order Summary
On the checkout page, customers can use Show Order Summary to review all of the items in their orders. So you can change the background image or color to display after the order summary. After that, you should use the Preview of Show order summary to ensure that it looks well.
#1. Open Settings > Checkout
#2. Open Style > Customize Checkout
#3. Find the Order Summary section then select one of 2 choices below
- In the Background color, navigate to the box to display the full options of colors. You can select an available color or enter a hexadecimal code to show another.
- In the Background image, tap on Select Images or Upload Images.
#4. Click Save to finish the process.
For mobile devices, you open Shopify apps and then go to Store > Settings. After that, follow the same instructions above.
Customize The Shopify Checkout Page By Editing An Image
On the checkout page, store owners can freely add or remove any images to have the most eye-catching page. Read these steps below to remove an image and use an alternative one.
#1. Open Settings > Checkout
#2. Open Style > Customize Checkout
#3. In case you want to change the image, click on Update under it and Upload or Select another. If you want to remove an image from the checkout page, tap Remove the image.
#4. Click Save to finish the process.
For mobile devices, you open Shopify apps and then go to Store > Settings. After that, follow the same instructions above.
Adding Image Alt Text To Improve SEO
After you decide on the images on the checkout page, you can add alt text to improve your SEO and reach more visitors. Here is the instruction.
#1. Click on Update under the image, then open Edit image.
#2. Type alt text for the image. You should select keywords to reflect the content of the image.
#3. Click on Save.
Besides, to optimize the images, you can also change the size of them. Read Tips to optimize the Shopify image sizes for more detail.
Change The Font On The Shopify Checkout Page
You can’t change the color of the text on Shopify due to technical reasons. However, you can select the font text from a premade droplist.
#1. Open Settings > Checkout
#2. Open Style > Customize Checkout
#3. Find the Typography section then open the Headings drop-down or the Body drop-down to choose a suitable font.
#4. Click Save to finish the process.
For mobile devices, you open Shopify Apps and then go to Store > Settings. After that, follow the same instructions above.
Customize Button And Accent Colors On The Checkout Page
On the checkout page, you can customize the button, error message, or accent by changing their colors. However, make sure your colors are clear enough for customers to read the content under the background of the main content and order summary.
#1. Open Settings > Checkout
#2. Open Style > Customize Checkout
#3. In the Accents, Buttons, or Errors, navigate to the box to display the full options of colors. You can select an available color or enter a hexadecimal code to show another.
#4. Click Save to finish the process.
For mobile devices, you open Shopify Apps then go to Store > Settings. After that, follow the same instructions above.
Add Features To The Post-purchase Page At Checkout
After customers finish their payment process and before they go to the order confirmation page, you can utilize this interval to ask customers for a survey or offer other products. To do so, you need to install checkout apps and select a checkout page.
Note that at the same time, you can use only one app to add post-purchase features. In case you installed multiple apps, you can select one of them in the checkout settings.
How To Install A Checkout App To Add Post-purchase Features
To add a post-purchase feature on the Shopify checkout app, you can contact us to be supported.
Here are some steps to instruct you:
#1. Read reviews about Shopify checkout apps and select the best one.
#2. Log into Shopify Store to Add App.
#3. Click Install App
#4. Open Shopify admin to find the Apps Section and navigate the app that you selected.
#5. Configure as required.
Choose An App To Use On Your Post-purchase Page
After you complete installing the app, you need to choose this app to run on the Shopify checkout page.
#1. Open Shopify admin> Settings
#2. Open Checkout.
#3. Find the Post-purchase page section then choose the app that you want to use.
In conclusion, Arrowtheme wishes you to have a nice Shopify checkout page after customizing it.
Contact US – ArrowTheme:
– Email: [email protected]
– Facebook: Facebook.com/ArrowThemeTeam
– Website: ArrowTheme.com