Shopify sections: Everything you should explore
Shopify theme ecosystem has introduced the latest feature – Shopify sections. This feature enables store admin to customize their store in a flexible way. So what are the sections, where we can use sections and how to create sections? This blog will explain more details about Shopify sections.
What are Shopify sections?
Firstly, it is important to understand what are sections. Sections belong to the Theme Editor – an interface tool to help you change and design your store themes. In other words, sections are customized blocks of store theme content. So, store owners use sections to create the appearance of your online store without any coding knowledge.
Particularly, the admin can add, arrange and delete sections to reuse the templates or customize the themes. Due to a greatly integrated and streamlined user interface, these manipulations are so easy for store owners to do.
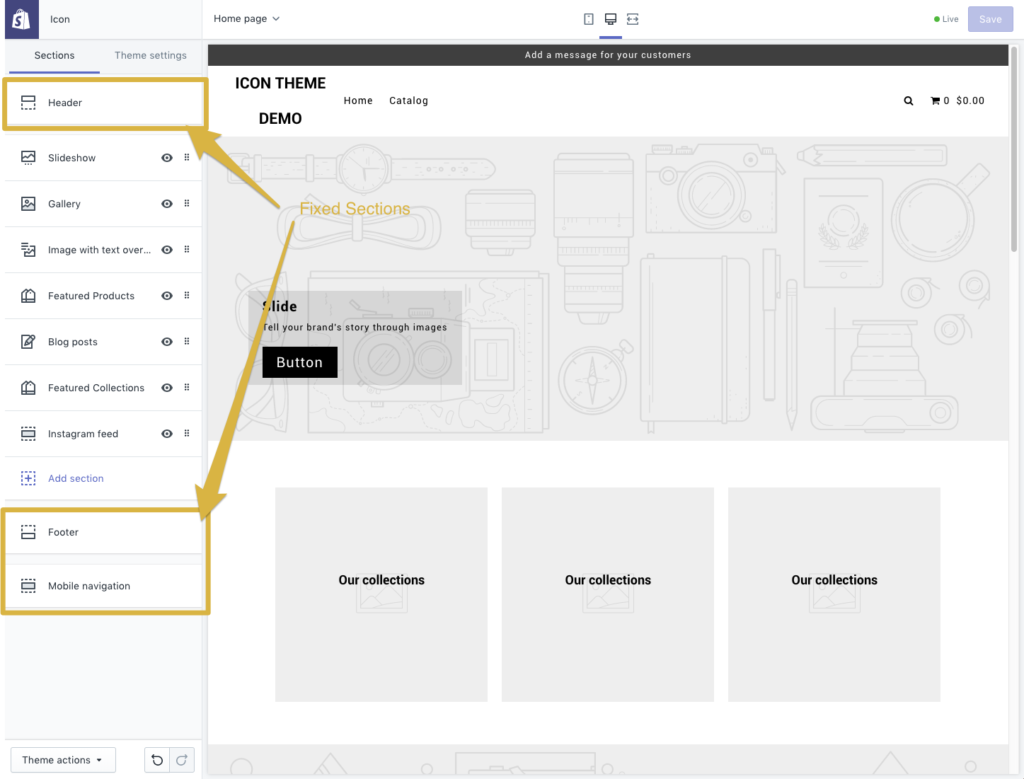
There are 2 types of sections including the static section and dynamic ones.
- Static sections are not unchanged. You can not move them around or arrange them. You can use Theme Editor to customize these sections.
- Dynamic sections are flexible to edit if your theme has presets defined in their respective {% schema %} tags.
Where do you use Shopify sections?
Till now, you can use sections flexibly on the home page. So you can create an appealing store. On other pages, you can use sections but you can not reorder these sections.
To change the sections, go to Sales Channels – Online Store – Themes – Customize theme area of each theme. Although these sections are set up by default, you can reorganize them when they are apparent.
Benefits of sections
There are some highlight features of sections.
- Completely control sections separately – This function saves your time and effort when you have some adjustments. Instead of fixing all the elements, you only need to change individual sections.
- Numerous types of sections: You can display the Homepage in various types.
- Multiple purposes for one type of sections: You can use “Images with text” to show promotions and customer reviews.
In the future, Shopify tends to develop sections for products, collections, blogs and other parts of themes.
How do I add a section?
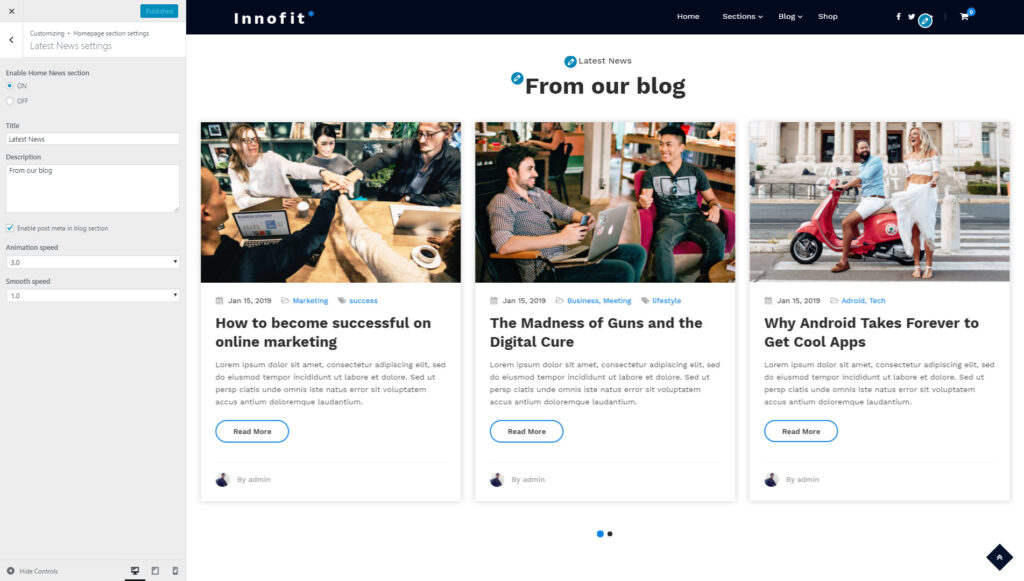
To the left of the panel, select “Add section”, there will be many section options for you to add to the homepage. Some common section options are galleries, logo lists, text, collections, products, images, videos, blogs, social media and so on.
After adding a section, you also adjust the blocks inside the section. Imagine that a section will group many small blocks. If you delete the section, all the grouped blocks will be removed too. For example, in the Slideshow section, we can have a lot of slide panels. We can use slide panels for different purposes. For instance, you can use one block for displaying the hottest item while another shows the customers reviews.
How to build the first section template
Step 1
Go to the sections folder in your themes and add a new section with a .liquid extension. You can name the file by the name of sections in the template file. You can refer to the folder structure below.
your-theme
  - assets
  - config
  - layout
  - sections
    - - your-cool-section.liquid
  - templates
Also, in case you want to save your-cool-section in the template, add the below into the templates > collection.liquid file:
{% section 'your-cool-section'%}Step 2
It is the next step to set up the basement. Then, we will create the sections by the following codes. The base template in your your-cool-section.liquid file will appear like this:
{% schema %}
{% endschema %}

{% stylesheet %}
{% endstylesheet %}

{% javascript %}
{% endjavascript %}
Step 3
Although there are 3 liquid tags of sections including {% schema %}, {% javascript %}, and {% stylesheet %}, we only go into detail with the schema tag. Within the schema tags, we would insert JSON, which would define how the Theme Editor “reads” our content. The JSON object – which has different settings and blocks- includes all the section schema. Here is an example section schema.
{% schema %}
  {
    "name": "gallery",
    "blocks": [
      {
        "name": "image",
        "type": "image",
        "settings": [
          {
            "id": "image_thing",
            "type": "image_picker",
	    "label": "Gallery Image",
	    "info": "Upload an image to be added to the image gallery on the homepage"
          }
        ]
      }
    ]
  }
{% endschema %}
All the information about the section is included in the overarching object. Our example is about Static Section so it will be inside the template which uses the {% section ‘your-cool-section’%} tag. You should note that if the admin changes the section, all the related to this section will be edited across templates. This section is named “gallery” because we want to create a photo gallery that consists of many individual photo blocks.
Arrowtheme suggests to you a tip to edit sections. Go to the Online Store>Themes>Customize Theme. The sections tab appears on the left of the sidebar. Note that you are on the page where the section content displays.
Properties of the sections
There are some properties of the sections as list below:
- name which the sections reffered to in the slidebar
- class: each section will be rendered in a div with a class of section. Class can specify an additional class name to add to the section div.
- settings same as the settings_schema file, sections have their own settings. The ID in the settings needs to be unique within a section, but not need to be across sections.
- blocks these are repeatable in the section. You can add, remove, and reorder them.
- max_blocks limits the number of blocks in a section. If do not settings, you can create unlimited blocks.
It is the general setting for the section. After that, we create a key block which consists of settings and the name of the type.
"blocks": [
  {
    "name": "image",
    "type": "image",
    "settings": [
      {
        "id": "image_thing",
	"type": "image_picker",
	"label": "Gallery Image",
	"info": "Upload an image to be added to the image gallery on the homepage"
      }
    ]
  }
]
The name and type are compulsory for the block. However, while in the settings, the type of content must be similar to one of the expected content types, the types directly nested in the blocks must not be.
Shopify sections and Shopify snippet
What is Snippet
Before making a comparison between sections and snippets, you understand the meaning of snippets. You may know the concept of partials or includes. They are called “snippets” in Shopify. To have a clear overview of Snippet, you can read the following features:
- Firstly, snippets consist of chunks of reusable code.
- Secondly, all snippets have the .liquid extension.
- Thirdly, they are in the Snippets folder.
- Forthly, Snippets do not appear across the theme but it can be on more than one page.
- Next, Snippets can be seen as % include ‘snippet name’ %}.
- Also, You can reference the snippet name without appending the .liquid extension.
- In addition, Snippets combine social links and pagination blocks.
- Finally, when a snippet is included, all the variables can be accessed within its parent template.
Difference between Shopify sections and snippets
The key difference between sections and snippets files is that variables inside of a section file do not appear outsides. You can see the following example.
# layouts/theme.liquid
{%- assign var_from_template = 'Hello from template' -%}
{% section 'header' %}
> {{ var_from_section }}

# sections/header.liquid
{%- assign var_from_section = 'Hello from section' -%}
> {{ var_from_template }}

# Rendered output
>
>
This example points out that the section does not create the variable from the template and the template does not create output from the section. However, in case a section file contains a snippet, it can help you access variables within the section file.
In conclusion, Arrowtheme hopes that you can know better about the Shopify sections and how to use them to beautify the Shopify themes. You can refer to some stunning Shopify themes and the awesome Shopify Packages for your business. We are proud to offer an amazing Shopify Package for your business, which will be a right solution for all Ecommerce businesses. Coming to our services, you’ll have three options: Basic, Standard, and Advance. Don’t worry if you don’t know how to code. Because by simply picking one of three packages, our experts will help you in creating a beautiful and functional online store at a cheap rate cost. So let’s make a decision right now!