How to create and use custom post type in WordPress
When it comes to WordPress custom post types, you can see that they come in handy. To put it simply, they are what turn WordPress from a simple blogging platform into a content management system. Besides, they provide you the control you need to build a unique website. In this article, Arrowtheme will deliver you the detailed guide to create and utilize WordPress custom post type. Hence, let’s explore with us right now!

What is WordPress custom post type?
In WordPress, when it comes to post types, they are a technique of categorizing different sorts of material. Besides, the two most popular post types are posts and pages. However, you may not be aware that WordPress also has a few other post types. For more details, they are:
- Posts
- Pages
- Attachments
- Revisions
- Navigation Menus
- Custom CSS
- Changesets
Moreover, changesets are likely unfamiliar to you, and you may utilize custom CSS on your site. But, it never occurred to you that these could be post kinds. In fact, the five post kinds are the only ones that most WordPress users and developers need to worry about: Posts, Pages, Attachments, Revisions, and Navigation menus. Now, you should take a closer look at each WordPress custom post type to gain a better understanding of them.
1. Posts
The first WordPress custom post type in this topic is Posts. In fact, the “post” is the most common post type in WordPress. Besides, posts are dynamic content that is updated on a regular basis. Additionally, you can tag and categorize them, which means they will appear in several archive sites as well as on your home page and blog page. Typically, your posts will make up the majority of your website’s material.
2. Pages
Pages are the other popular WordPress custom post type you should know if you currently have a WordPress site. For more details, they are static content that means they last longer than posts and provide information on topics that don’t change frequently. Simply speaking, your contact information or the “About Us” of your website are prime examples.
What’s more, pages aren’t allowed to have categories or tags, and they are not meant to be displayed on archive pages. Rather than, visitors will access them through your navigation menu.
3. Attachments
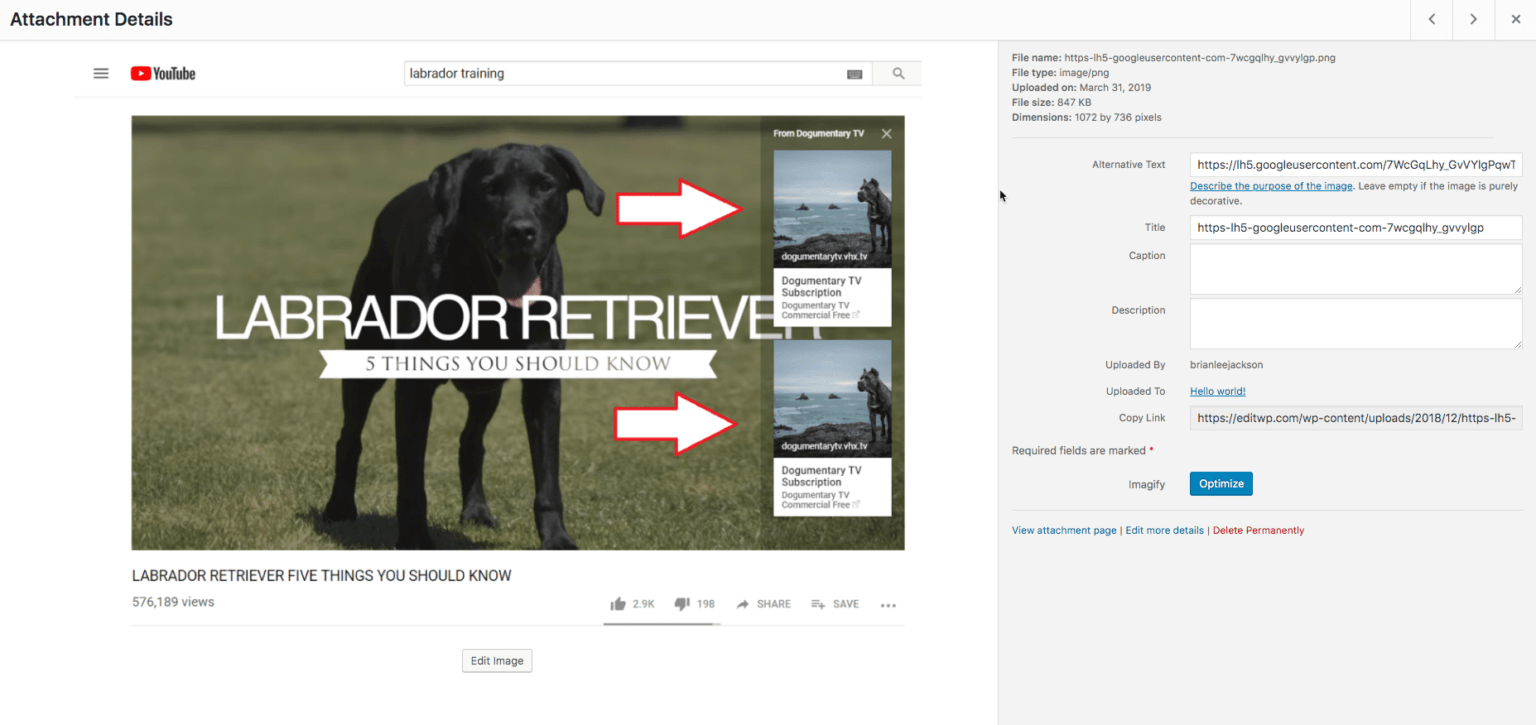
In terms of Attachments, they are a piece of media that you have submitted to your website. In reality, this isn’t the media file itself, but the information about it in the WordPress database. As a result, each attachment will have a unique ID as well as metadata such as a title, description, and alt text. In addition, each attachment has a separate attachment page with its own URL. Best of all, the URL for this can be found in the media editing screen for that attachment:
Furthermore, attachments can be photos, movies, pdf files, and other types of media. Plus, you can view and update them through the Media section of the WordPress admin menu. Not only that, you can upload them straight to posts and pages while editing them. Alternatively, any attachment you add to a post will appear in the Media menu, where you may modify and view it.
4. Revisions
The next type in WordPress custom post type you must know is Revisions. Simply speaking, when you save a new version of a post, page, attachment, or custom post type, WordPress creates a revision of the post/ page.
Following that, you must go to the relevant editing screen for any post or page on your site. Then, let’s open the Document tab on the right-hand side in order to see the revisions. Additionally, you will get a message here that tells you how many changes this post has received. Then, you will be directed to a screen that shows your most recent two versions of your post as soon as you click the Revisions box. Best of all, you may see the revisions and go back to an older version of the post from here.
Furthermore, over time, WordPress will generate a large number of revisions for your site. As a result, a database will be full with them.
5. Navigation Menus
Navigation menus, or you can understand that the items in your navigation menus, are a post type as well. To put it plainly, each item in your navigation menu is saved in the database as a separate item. In fact, WordPress understands this is a navigation menu item, where it should appear in the navigation menu and connect to thanks to its metadata. Moreover, navigation menu items can’t be edited as similar to the manner that other post types may. Instead, you need to use the Customizer or the Menus screen to make changes.
6. Custom CSS
In case you use the Customizer to apply custom CSS, your materials will be saved as a custom post type. For custom CSS related to each theme on your site, a new post will be created. Plus, WordPress will only utilize the one for the currently active theme.
7. Changesets
The last one in WordPress custom post type is Changesets that are similar to revisions. However, they apply to the Customizer rather than posts. Besides, when you use the Customizer to make a modification, it is saved as a changeset that is the same as a draft.
>>> Read more: Why you need a WordPress maintenance plan for your website
Main differences between a Post and a Custom Post type
Basically, a post can be one of two following things. First of all, a post type is a category to which a piece of content belongs. Moreover, a “post” is a post type, just like a “page”, a “attachment”, or any custom post type you create. Your custom post type, on the other hand, isn’t a “post” in the sense of a blog post. Simply speaking, it is a post type in the sense that it includes all posts (of all post kinds) in the database.
Common uses of WordPress custom post type
The following are some instances of custom post types:
- First and foremost, Products for an online store.
- Secondly, Projects or portfolio pieces for a portfolio webpage.
- Thirdly, maps for a mapping site.
- Fourthly, events for a bookings site.
In fact, these are a few of the most typical usage scenarios, but they are far from exhaustive. Furthermore, in some circumstances, you just need to create a category to divide your new content may be sufficient. For instance, let’s suppose you operate a blog and want to incorporate case studies that you can display on their own page (using a “Case Study” category you make) as well as in the main blog. However, if you want to keep your fresh content separate from regular blog entries, a custom post type is the best way.
How WordPress post types are stored
In reality, WordPress custom post type is kept in the same manner that regular posts/ pages are. Besides, a number of database tables are used to store content and settings on your WordPress website. Typically, the minimum number of tables is 12. But, if your site is running Multisite or if you have a plugin that adds more tables, you may have more.

As you can see from the image above, there are two tables that appear to have something to do with posts: wp_posts and wp_postmeta.
In terms of the wp_posts table, it maintains the content of all of your posts, regardless of post type. Thus, whether it is a blog post, a page, a revision, an attachment, or a custom post type, the wp_posts table will all keep them.
Additionally, because each post has a value in the post type field of the wp posts table, WordPress knows what type of post it is. Plus, that value will be the same as the post type’s name. Moreover, when you create a new blog post, WordPress will generate a post with the post_type of “post” in the wp_posts table. In addition, in case you create a custom post type called “product”, each new product you create will generate a line in the wp_posts table with “product” as the post type_field’s value.
On the other hand, the wp_postmeta table is used to store and keep track of post metadata. Basically, it consists of four sections as below:
Four sections
- Firstly, meta_id: the id of this item is included in the wp_postmeta table.
- Secondly, post_id: the post to which this piece of info belongs. Not only that, in the wp_postmeta table, a post can contain several lines.
- Thirdly, meta_key: the unique identifier for this type of info. For instance, one possible key for a static page may be page template, which would indicate which page template is being utilized.
- Finally, meta_value: it is the field’s value. The meta_value here would be “default” in case a page uses the default page template.
As a result, the types of information recorded for a specific post will vary depending on the post type. Furthermore, you don’t have to worry about which data is kept in wp posts and which is stored in wp_postmeta. However, you should know that all post types are stored in the same place, which means WordPress can interact with them all in a similar way.
Where is WordPress custom post type stored?
In order to store content and settings, your WordPress website needs to use a database table. In case you build a custom post type called “case study”, for example, each new case study you create will generate a line in the wp_posts table with “product” as the post_type field value. Besides, since each post has a value in the post type field in the wp posts table, WordPress knows what type of post it is.
How to create a custom post type in WordPress?
Create WordPress custom post type using a plugin
Using a plugin is the first and also the simplest way to create a custom post type in WordPress. In reality, this method is ideal for beginners because it is both safe and easy. For more details, installing and activating the Custom Post Type UI plugin is the first step. When you activate the plugin, it will add a new menu item called CPT UI to your WordPress admin menu. Simply speaking, you need to create a new custom post type by moving to CPT UI >> Add New.

To begin, you must give your custom post type a slug. For more details, only letters and digits are allowed in this slug. This is because it will be utilized in the URL and WordPress queries. Besides, the plural and singular names for your new post type must be entered below. Then, you must click the link that says “Populate more labels based on chosen labels”. As a result, the rest of the label fields down below will be filled in.
After that, you may add a description for your post type and edit labels by scrolling down to the “Additional Labels” section.
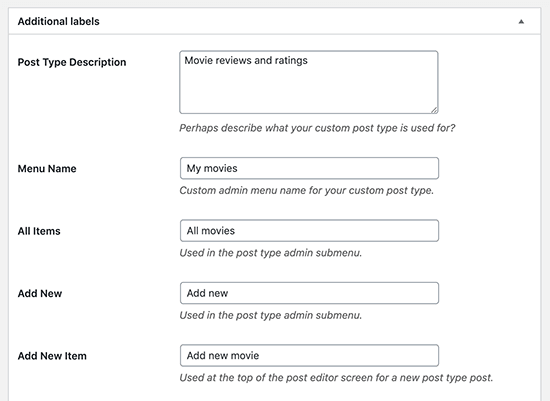
Moreover, when managing material in that particular post type, labels will be used throughout the WordPress user interface. Then, there is the option to change the post type settings. Plus, you are able to put up different attributes for your post type from here. Each option is accompanied by a brief description of what it accomplishes.
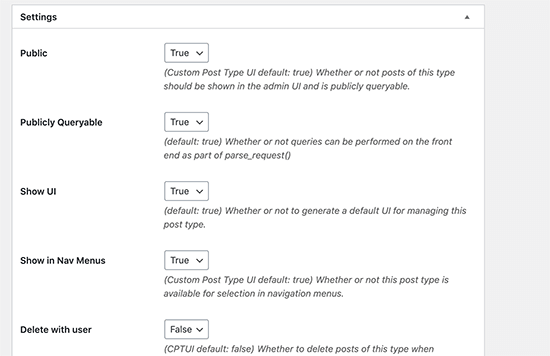
For example, instead of making a post type hierarchical like pages or reverse chronological like posts, you can choose to make it non-hierarchical. What’s more, you can choose which editing options this post type will support just below the basic settings. Following that, you just need to select the choices you want to be contained.

Lastly, in order to save and create your own post type, you must click the “Add Post Type” option.
How to create WordPress custom post type manually?
Although using a plugin is the easiest way, it can cause the problem that when you deactivate it, your custom post will vanish. Besides, any data in those custom post types will remain intact. However, they will be unregistered and unavailable in the admin area.
What’s more, if you are working on a client site and don’t want to install another plugin, you can create your own post type directly. Simply speaking, you must add the required code to your theme’s functions.php file or a site-specific plugin.
To begin, you have to examine the following code:
1 // Our custom post type function
2 function create_posttype() {
3
4 register_post_type( 'movies',
5 // CPT Options
6 array(
7 'labels' => array(
8 'name' => __( 'Movies' ),
9 'singular_name' => __( 'Movie' )
10 ),
11 'public' => true,
12 'has_archive' => true,
13 'rewrite' => array('slug' => 'movies'),
14 'show_in_rest' => true,
15
16 )
17 );
18 }
19 // Hooking up our function to theme setup
20 add_action( 'init', 'create_posttype' );
In addition, this code creates a new post type called ‘movies’ with an array of parameters. The initial portion of this array is labeled, which is an array in itself. Plus, other arguments in the second section include public visibility, has archive, slug, and show in rest, which enables block editor support. Now, you should look at a more detailed piece of code that gives your custom post type extra choices.
1 /*
2 * Creating a function to create our CPT
3 */
4
5 function custom_post_type() {
6
7 // Set UI labels for Custom Post Type
8 $labels = array(
9 'name' => _x( 'Movies', 'Post Type General Name', 'twentytwenty' ),
10 'singular_name' => _x( 'Movie', 'Post Type Singular Name', 'twentytwenty' ),
11 'menu_name' => __( 'Movies', 'twentytwenty' ),
12 'parent_item_colon' => __( 'Parent Movie', 'twentytwenty' ),
13 'all_items' => __( 'All Movies', 'twentytwenty' ),
14 'view_item' => __( 'View Movie', 'twentytwenty' ),
15 'add_new_item' => __( 'Add New Movie', 'twentytwenty' ),
16 'add_new' => __( 'Add New', 'twentytwenty' ),
17 'edit_item' => __( 'Edit Movie', 'twentytwenty' ),
18 'update_item' => __( 'Update Movie', 'twentytwenty' ),
19 'search_items' => __( 'Search Movie', 'twentytwenty' ),
20 'not_found' => __( 'Not Found', 'twentytwenty' ),
21 'not_found_in_trash' => __( 'Not found in Trash', 'twentytwenty' ),
22 );
23
24 // Set other options for Custom Post Type
25
26 $args = array(
27 'label' => __( 'movies', 'twentytwenty' ),
28 'description' => __( 'Movie news and reviews', 'twentytwenty' ),
29 'labels' => $labels,
30 // Features this CPT supports in Post Editor
31 'supports' => array( 'title', 'editor', 'excerpt', 'author', 'thumbnail', 'comments', 'revisions', 'custom-fields', ),
32 // You can associate this CPT with a taxonomy or custom taxonomy.
33 'taxonomies' => array( 'genres' ),
34 /* A hierarchical CPT is like Pages and can have
35 * Parent and child items. A non-hierarchical CPT
36 * is like Posts.
37 */
38 'hierarchical' => false,
39 'public' => true,
40 'show_ui' => true,
41 'show_in_menu' => true,
42 'show_in_nav_menus' => true,
43 'show_in_admin_bar' => true,
44 'menu_position' => 5,
45 'can_export' => true,
46 'has_archive' => true,
47 'exclude_from_search' => false,
48 'publicly_queryable' => true,
49 'capability_type' => 'post',
50 'show_in_rest' => true,
51
52 );
53
54 // Registering your Custom Post Type
55 register_post_type( 'movies', $args );
56
57 }
58
59 /* Hook into the 'init' action so that the function
60 * Containing our post type registration is not
61 * unnecessarily executed.
62 */
63
64 add_action( 'init', 'custom_post_type', 0 );
As you can see, this code includes a lot more options to the WordPress custom post type. Moreover, it will come with new features such as revision support, a featured image, custom fields, and so much more. What’s more, this new post type is also linked to a custom taxonomy called genres. Additionally, you should keep in mind that the hierarchical value has been set to false. Then, you can change this value to true if you want your custom post type to behave like Pages. Furthermore, another thing you must notice is the repetitive use of the string twentytwenty, which is referred to as text-domain. Alternatively, if your theme supports translation and you want your custom post types to be translated, you will need to provide the text domain that your theme uses.
Best of all, the text domain for your theme may be found in the style.css file in your theme directory. In particular, the text domain will be specified in the file’s header.
How to display WordPress custom post type?
WordPress has built-in functionality for displaying custom post types. You need to put your new custom post type to work on your website once you’ve added a few items to it. Moreover, there are several strategies to choose from, each with its own set of advantages.
Way to display custom post type using default archive template
To begin, you have to navigate to Appearance >> Menus and create a custom link for your menu. Simply speaking, the link to your custom post type is contained in this custom link.
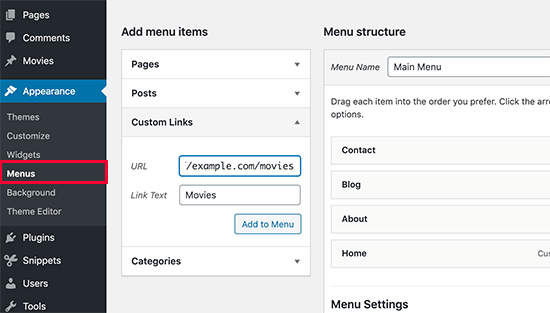
Besides, you need to use SEO-friendly permalinks, and then, your CPT’s URL will probably look like this: http://example.com/movies
Additionally, in case you don’t use SEO-friendly permalinks, your custom post type URL will look like this: http://example.com/?post_type=movies
More crucially, you need to replace example.com with your own domain and movies with the name of your custom post type.
Then, you must go to the front-end of your website and save your menu. What’s more, when you click on the new menu you built, it will take you to your custom post type archive page. For more details, it will be displayed using the archive.php template file in your WordPress theme.
How to display custom post type in WordPress by using Custom Templates for CPT Archives and Single Entries?
You can take advantage of a special template for a custom post type archive if you don’t like the look of the archive page for your custom post type. You just need to add a new file called archive-movies.php in your theme directory in order to accomplish this. More importantly, you need to substitute the name of your own post type for movies.
To begin, you must copy the contents of your theme’s archive.php file into the archive-movies.php template. Then, you have to begin customizing it to match your requirements.
How to display custom post types on the front page?
Custom post types have the advantage of separating your custom content types from your regular posts. If you want them to appear alongside your regular posts, just need to add the following code to your theme’s functions.php file or use a site-specific plugin:
1 add_action( 'pre_get_posts', 'add_my_post_types_to_query' );
2
3 function add_my_post_types_to_query( $query ) {
4 if ( is_home() && $query->is_main_query() )
5 $query->set( 'post_type', array( 'post', 'movies' ) );
6 return $query;
7 }
Most importantly, bear in mind that you must replace movies with your WordPress custom post type.
Querying WordPress custom post type
You can execute loop queries in your templates if you are sufficient with coding. Besides, you are able to get items from a custom post type by running a database query.
1 <?php
2 $args = array( 'post_type' => 'movies', 'posts_per_page' => 10 );
3 $the_query = new WP_Query( $args );
4 ?>
5 <?php if ( $the_query->have_posts() ) : ?>
6 <?php while ( $the_query->have_posts() ) : $the_query->the_post(); ?>
7 <h2><?php the_title(); ?></h2>
8 <div class="entry-content">
9 <?php the_content(); ?>
10 </div>
11 <?php endwhile;
12 wp_reset_postdata(); ?>
13 <?php else: ?>
14 <p><?php _e( 'Sorry, no posts matched your criteria.' ); ?></p>
15 <?php endif; ?>
Firstly, in the arguments for our new WP_Query class, we have defined the post type and posts per page. After that, when you performed our query, which returned the posts, which it then displayed inside the loop.
How to display custom post types in Widgets?
WordPress has a default widget for displaying recent posts, but it doesn’t let you select a custom post type. To begin, you must install the Ultimate Posts Widget plugin and activate it. For more details, you just need to go to Appearance >> Widgets and drag the Ultimate Posts widget to a sidebar after activating it.

In addition, this handy widget lets you display recent posts from any post type. Not only that, you can also show post excerpts with a read more link next to the title, or even a featured image.
In addition, you must select the parameters you want to use and your custom post type to customize the widget. After that, don’t forget to save your changes and go to your website to see the widget in action.
Wrapping up
In conclusion, the feature that transforms WordPress from a simple blogging platform to a true content management system is WordPress custom post type. It enables you to develop complicated, custom websites that can serve as storefronts, reference centers, media sites, or whatever else you require.
Best of all, if you are without coding knowledge and experience, our WordPress website packages are the best solution for you. Specifically, our WordPress professionals will rapidly build your ecommerce website in one of three packages: Basic, Standard, or Advance. In particular, we are having a sale upto 30% for many other services that will ensure your site always runs in the best condition. Thus, what are you waiting for without connecting us through our CONTACT FORM right now!