How to Add a Page on Shopify to Make a Perfect Online Store
You’ll need to build some pages regardless of the size of your Shopify store—whether it’s a large catalog of items or a simple one-product store. A homepage, an About Us page, a Contact page, a page describing your return policy, a FAQ page, numerous collection pages, and of course, product pages are all pages that any store requires. Your pages play an important role in checkpoints along your customer’s sales journey.
So, first and foremost, let’s go through How to add a page on Shopify to make a perfect online store step by step.
How To Add New Pages On Shopify?
You’ll need pages to start building up your business. There are several kinds of pages. Before going on to product and collection pages, let’s start with the most basic of pages.
Here’s how to add generic pages to your Shopify store, such as your FAQ or Contact Us pages:
Step 1: Go to your Shopify dashboard and log in. Firstly, let us enter the cockpit. Simply go to Shopify.com and click Log in if it isn’t already in your bookmarks.
Step 2: Select Online Store > Pages. To extend your options, navigate to Online Store on the left side of your Shopify dashboard. After that, select Pages. If you’ve previously made some pages, this is where they’ll appear.
Step 3: Select Add page. You’ll see a helpful little button in the upper right corner of the page that says Add page. When you click that button, you’ll be sent to the page creation screen.
Step 4: Give your new page a title and begin adding content. At this step, you can start building your new page. Although you should already know what page you’re making at this stage, Shopify provides a few choices in the title box (“e.g. Contact us, Sizing chart, FAQs”).
You may also change how your page appears in search engines like Google after you’ve provided these details. It will pull in your title and page content automatically. But you can get more control over your SEO by editing the title, meta description, and URL handle.
Step 5: Make sure the page is visible. Finally, you may choose whether your store’s page is Hidden or Visible. It will become visible after you save your page. However, you can make it appear later by selecting Hidden and entering the date you want it to appear.
You may also select a theme template for the page depending on your existing premium Shopify theme and any apps that generate templates (like Shogun Page Builder).
When you’re done, click Save. So congratulations for creating a page!
How To Add A Product Page On Shopify?
Each product you create on Shopify is given its own page. As a result, producing product pages differs from making standard pages (covered above).
Here’s a step-by-step guide on making a product page on Shopify.
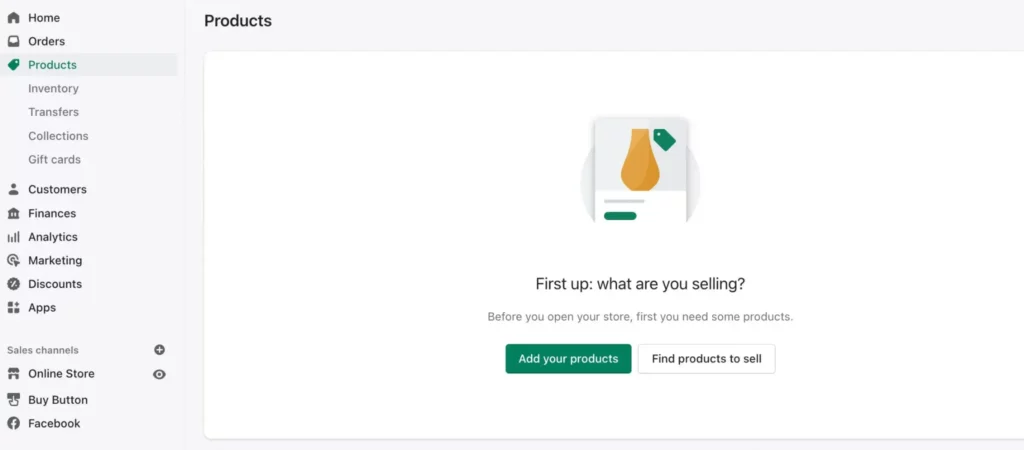
Step 1. Go to Products from the dashboard’s left-hand menu.
Firstly, go to Products in the left-hand menu on your Shopify dashboard.
This is where you may keep track of inventories and save all product info. We’ll only be adding a product and filling up its data for our needs.
Step 2. Select Add product
The Add product button is located in the top right corner. You’ll be taken to the product information if you click that button.
Step 3. Add the title, description, and photos for the product.
The title, description, and media are the first elements you see when you go to the product detail page.
Fill in the title with the name of your product, write a compelling product description, and include stunning product photographs and other media to entice customers to buy.
Now that you’ve included the information that will make up the majority of your product page, it’s time to go into the details of your product.
Step 4. Fill in all of your product information.
You can’t sell your items unless you’ve thought of little detail. They assist you in organizing your items, keeping track of your inventory, calculating shipping costs, and much more.
Here’s everything you can include in your product data to get started selling:
- Cost per item and pricing
- Inventory monitoring, SKU number, and barcode
- Weight of shipment and customs information
- Variations in products (called Options here)
- Vendor, product type, product groupings, and tags are just a few of the options.
- Details about the theme template and SEO
After you’ve filled in all of the product data, click Save to save the product and its page to your shop. So now repeat this process for all of your goods. And finally, you’re done!
How To Add A Collection Page On Shopify?
Collection pages are generated in the same way that product pages are established: by creating a new product collection.
Collections are sets of items that you put together based on your own preferences. For example, this might include all goods with the tag “knits,” all giftable products priced under $50, or a recently released range of products.
You can make them by manually adding products one by one or by automating the process based on your own rules.
On Shopify, collection pages highlight a certain product line. A title, a description, and an optional image are all included (which acts as the background for the title in the header).
Instead of evaluating several product pages one by one, customers may browse your collection pages to find exactly what they’re looking for.
Adding a collection page to your Shopify store is simple. In a nutshell, the stages are as follows:
1. Go to Products > Collections and select Create collection
2. Provide a title, description, and image for the collection.
3. Modify the collection page SEO
4. Select a collection type (manual or automated)
5. Add your item
6. Press the Save button.
Now You Know How To Add A Page On Shopify
Adding new pages to your Shopify store is simple, whether you do it yourself or get the assistance of ArrowTheme. With our Shopify Packages, you can completely customize the appearance and feel of your store pages in less time and without having to worry about coding.
In no time, your store will be looking fantastic. So don’t hesitate to Contact US right now if you are looking for awesome solutions for your business.
Contact US – ArrowTheme:
– Email: [email protected]
– Facebook: Facebook.com/ArrowThemeTeam
– Website: ArrowTheme.com