Recharge Shopify: The Benefits & Step-by-Step Setup
ReCharge is known as a fantastic app that makes selling subscription items simple and straightforward. In a Shopify store, this app was created with the main purpose of assisting both merchants and customers. Best of all, it will provide recurring items and subscription packs to businesses. Customers will also appreciate how easy it is to manage their subscriptions right from your website.
This is the biggest reason why you need to set up Recharge for your Shopify online store. In this article, Arrowtheme will give you a comprehensive instruction on Recharge Shopify. Let’s explore with us right now!
What is Recharge Shopify?
When it comes to ReCharge, it is a Shopify-exclusive recurring payment app. It offers physical subscription products to retailers and streamlines the checkout process for customers. With the help of ReCharge, you won’t have to worry about forgetting an order.
Because it will automatically repeat your customers’ subscription orders based on your specifications and store them to your Shopify Orders. In addition, subscription rules can be used to configure the system. Then, you can change the frequency and time at which the customer is charged. Not only that, you can also provide discounts, create deadlines, and provide gift subscriptions.
Additionally, your clients can easily manage their subscriptions straight from your store thanks to the ReCharge customer site. What’s more, you can prevent subscribers from skipping or terminating their subscriptions. Best of all, this application also assists in the creation of user-defined, brand-friendly notifications.
In terms of Inventory Management systems of ReCharge, it will seamlessly integrate with your inventory system of ecommerce platform and monitor your store’s stock counts using SKUs. Plus, customers must pay a charge to join up for a ReCharge subscription package in order for the payment processor to capture and secure the customer’s credit card data.
After that, your orders will be instantly updated so that you can manage and execute them from Shopify. Furthermore, ReCharge will also connect the orders to all Shopify integrations, such as fulfillment, stock, and accounting.
How ReCharge Work With Shopify
ReCharge allows Shopify users to set up recurring charging options for their products. Then, customers will see a separate Recharge page when they check out to complete payment.
In fact, both Shopify and ReCharge will be in charge of monitoring and controlling consumer accounts on their own. Best of all, ReCharge users just have to pay $39.99 USD per month plus an additional fee per recurring order, which varies based on the size of your company.
Great Benefits Of Connecting Recharge Shopify
In reality, ReCharge makes selling and managing subscriptions simple for Shopify business owners. ReCharge clients, on the other hand, didn’t have access to a complete data collection in Google Analytics unless they hired pricey Google Analytics experts.
In terms of Google Analytics, it is a complex data platform that enables multi-layered tracking, buyer behavior analysis, segmenting by user characteristics, etc. It is considered as one of the most powerful free tools to marketers. While Google Analytics provides hundreds of KPIs and free features for stores of all sizes, it is not without flaws.
Regrettably, just installing ReCharge on your Shopify or Shopify Plus store limits the connection’s full potential. Through an automatic, powerful Google Analytics interface, Shopify ReCharge connection provides precise data for recurring purchases.
As a result, merchants gain not only in terms of reliable data, but also in terms of additional features, automated tools, and ways to track their store’s performance in Google Analytics.
#1. Track first-time payments and recurring transactions automatically
Shopify monitoring has improved, making Shopify reporting 10 times easier. Therefore, merchants can enjoy simple tracking of the whole customer journey as well as accurate marketing attribution with Shopify ReCharge integration. In particular, you won’t have to do anything after granting GA access.
#2. Get subscription income marketing attribution
Integrating your ReCharge checkout with Google Analytics will automatically for accurate subscription income, including one-time and recurring purchases.
#3. Segment your performance
Moreover, connecting ReCharge to your Shopify site allows you to track performance by segment, whether it’s by payment source, subscription plan type, or product category. This not only ensures accurate tracking of your whole ecommerce funnel, but it also frees you up to use Shopify’s automatic reporting to increase income.
#4. Benchmark your website
With comprehensive eCommerce benchmarking tools, you can see how you compare to other subscription-based Shopify merchants. Integrating Recharge Shopify in addition to allowing you to examine website benchmarks by industry, it also helps you to identify which critical indicators are performing well and which need to be improved. Best of all, professional-level subscription analytics capabilities are now available through the ReCharge link.
Step-To-Step To Set Up Recharge Shopify’s Payment
Step 1. Add Recharge to your product page
In order to establish Recharge Shopify’s payment for your Shopify store, you need to choose the file where the product form begins in your theme files. For instance, product.liquid, product-form.liquid, or product-detail.liquid.
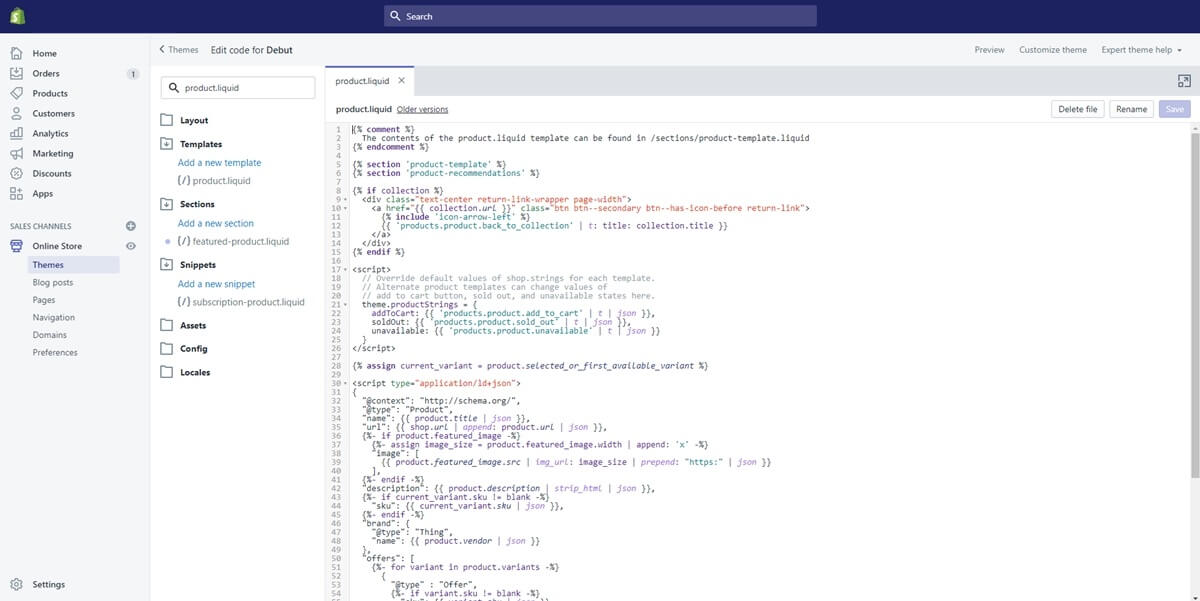
Then, let’s find the form tag with an action attribute set to /cart/add. Now, you should refer to this following example:
<form id=”add-item-form” action=”/cart/add” method=”post”><br>
After that, you have to enter the code in the line below the form:
{% if product.available %}{% include ‘subscription-product’ %}{% endif %}

Step 2. Enter the code to the form on the product page
The next stage you must implement in order to set up Shopify Recharge for your online store is insert data-productid=”{{product.id}}” to the form on the product page. As a result, you will gain the outcome like below:
<form id=”add-item-form” action=”/cart/add” method=”post” data-productid=”{{product.id}}”>
Then, you need to find a select/an input with the attribute name=”id” in the same product.liquid file. Let’s consider the following examples for more details:
<select id=”product-select-{{ product.id }}” name=’id’><br>
<input type=”hidden” name=”id” value=”{{ product.variants.first.id }}” />
After that, all of those you can look for should have data-productid=”{{product.id}}” added to them. The end product should resemble this:
<select id=”product-select-{{ product.id }}” name=’id’ data-productid=”{{product.id}}”><br>
<input type=”hidden” name=”id” value=”{{ product.variants.first.id }}” data-productid=”{{product.id}}” /><br>
Step 3. Integrate the ReCharge to the cart page
Coming to the next step, you have to navigate to the file cart.liquid. At the very top of the file, you must type the following code:
{% include ‘subscription-cart-footer’ %}
On your cart page, you will need to hide your extra checkout buttons. To do so, let’s look for the following IF statement in your code:
{% if additional_checkout_buttons %}
….. THEME CODE ……
{% endif %}
Then, the tag with the class=”additional-checkout-buttons” attribute should be included. As a result, it will display the outcome below:
{% if additional_checkout_buttons %}
<span class=”additional-checkout-buttons”>
<div id=”additional-checkout-buttons”>
<span>{{ ‘cart.label.other_payment_types’ | t }}</span>
{{ content_for_additional_checkout_buttons }}
</div>
</span>
{% endif %}<br>
Step 4. Add the ReCharge to the theme.liquid
Then, let’s open your theme.liquid file and navigate the bottom of the page.
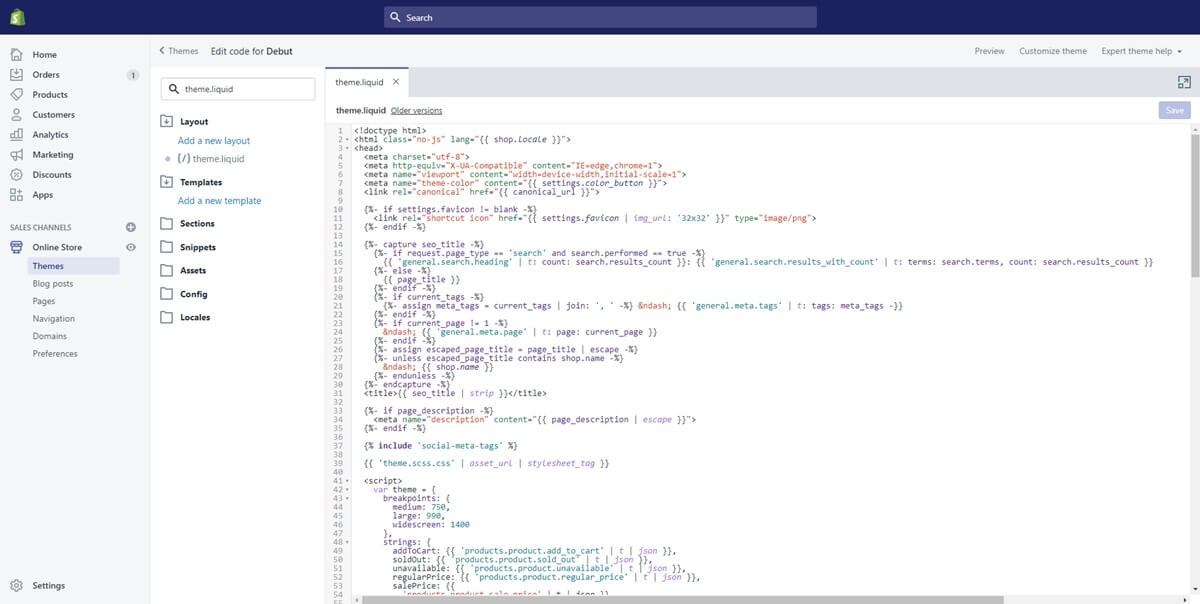
Above the ending body tag, don’t forget to add the following line:
{% include ‘subscription-theme-footer’ %}
Step 5. Add the ReCharge code to customers/account.liquid
In order to insert the ReCharge Shopify code to customers/account.liquid, you need to open the customer template named account.liquid in the Shopify Theme editor.

Then, enter the following code the line that has the Customer name:
{% if customer.metafields.subscriptions.customer_string %}
<!–BeginRechargeCode–>
<p><a href=”/tools/recurring/customer/{{customer.metafields.subscriptions.customer_string}}/subscriptions/”>Manage Subscriptions</a></p>
<!–EndRechargeCode–>
{% endif %}<br>
Moreover, the consumer can use the code to log into their accounts immediately via the Customer Portal. However, bear in mind that this link is only visible to clients who have purchased a subscription package.
Step 6. Insert the ReCharge code to ajax-cart-template.liquid
You can skip this step if your theme doesn’t have a snippet called ajax-cart-template.liquid. On the other hand, in case you have this file, you must open it and enter the following code at the end of it:
<style>
#AjaxifyCart .additional-checkout-buttons, #ajaxifyCart .additional-checkout-buttons {
display:none;
}
</style>
{% if template != ‘cart’ %}
<script src=’//ajax.googleapis.com/ajax/libs/jquery/1.7.2/jquery.min.js’></script>
<script>
rjQuery = jQuery.noConflict( true );
var subscription_active='{{shop.metafields.subscriptions.subscription_active}}’
function get_cookie(k){return(document.cookie.match(‘(^|; )’+k+’=([^;]*)’)||0)[2]}
if (get_cookie(‘recharge’)==’true’ || subscription_active==’true’) {
rjQuery(‘body’).on(‘click’,’form[action=”/checkout”] input[type=”submit”], #ajaxifyCart [name=”checkout”], #AjaxifyCart [name=”checkout”], #shoppingBagInner [name=”checkout”]’, function(e){
e.preventDefault();
window.location.href = ‘/cart’;
})
rjQuery(‘.additional-checkout-buttons’).hide()
rjQuery(document).ready(function(){
rjQuery(‘.additional-checkout-buttons’).hide()
})
}
</script>
{% endif %}<br>
Step 7. Upload a product to your subscription
To overhaul the integration and make sure it is well-installed, you can add a product to a new or existing order. You can add your extra items at a later time. Then, you are able to add your extra items at a later time.
Step 8. Check out/ Preview the app in your app store
For setting up the Recharge shopify for your online store, the last stage is put ?recharge=1 to the end of the URL of the product you’ve added. As a result, you can preview the subscription option.
In Conclusion
To sum up, as you can see, connecting Recharge with Shopify brings a lot of benefits for merchants. Hence, what are you waiting for without starting this integrating process right now? Not only that, in this article, Arrowtheme also instructs you detailed step to step to set up Recharge Shopify for your online store.
In particular, if you are considering using Shopify for your ecommerce website or want to make any changes to your site yet you don’t have any knowledge of coding, our Shopify Packages are the perfect option for you. Best of all, we are having the biggest sale program that gets up to 30% off for all of your Shopify services. Have any questions? Let’s fill out our CONTACT FORM with your details.
Contact US – ArrowTheme:
– Email: [email protected]
– Facebook: Facebook.com/ArrowThemeTeam
– Website: ArrowTheme.com