Shopify Refunds and Returns: How To Create & Minimize Them
As you may not know, Shopify refunds and returns play a significant important role for you to run your online Shopify store well.
Hence, creating as well as minimizing them is a must-have activity you have to do for your online store. If you don’t know how to generate and minimize them, let’s explore the blog below of Arrowtheme right now!
How To Create Shopify Refunds And Returns?
To begin, you may need to generate returns for customers if they want to return purchased items and reimburse a customer’s payment, depending on your return policy. The more promptly and successfully you refund orders, the more customers trustworthiness about your brand gain and may entice them to order again.
Best of all, you are able to make and handle returns from your Shopify admin, as well as send shipping instructions and return labels to your customers, trace returned items, replenish inspected items and reimburse money.
How To Create A Return For An Order In Shopify?
To help handle things that your customer wants to return, you can establish a return for an order. Following that, you may send any return shipping details to your customer and track the return when you create it. Moreover, thanks to filtering by return status on the Orders page, now you can manage all of your returns with ease.
Additionally, you can offer a refund and replenish appropriate items after receiving and inspecting the returned items.

What’s more, you can make a return on an order that has at least one fulfilled line item that hasn’t been refunded yet. If none of the line goods have been fulfilled, the order should be refunded and restocked.
In order to build a return for an order, you must apply following instructions:
#1. To begin, you must move to Orders in your Shopify admin.
#2. Then, you have to press the order that you expect to be refunded.
#3. Select Return items.
#4. After that, it will require you to enter the number of items being returned from the order.
#5. Choose one of the following options in the Return shipping options area:
- Firstly, create a return shipping label for your customer by selecting Create return label. However, this option is only available if your principal location and the shipping address for your customers are both in the United States.
- Secondly, choose Enter tracking information, if you have information of the Tracking number and Shipping carrier, let’s enter them.
- To create a return with no return shipping details, select No return shipping.
#6. Finally, press Create return.
Way To Filter Shopify Orders By Return Status
#1. The first step is going to Orders in your Shopify admin.
#2. Next, if you want to see all open orders, tab the Open tab.
#3. Select More Filters.
#4. Then, press Return status.
#5. Finally, select from Return in progress and Returned to display the returned orders.
How To Cancel A Shopify Return?
Luckily, you are able to cancel a return that you’ve created if you made a mistake or if a buyer has changed their mind about seeking a return. Following that, returns can only be canceled in the following circumstances:
- First and foremost, Shopify returns aren’t refunded
- Restock returns.
- Next, the return is not Marked as returned and is still open.
- There is no return label on the package.
- Besides, there is no return label on the package.
- There is no tracking information on the return.
- Finally, the return’s fulfillment is not canceled.
However, keep in mind that you can’t revive a return that has been cancelled, but you can establish a new one if you want.
Step By Step To Cancel A Shopify Return
#1. Firstly, visit Orders in your Shopify admin.
#2. In order to cancel a return, click the order for the return you want to cancel.
#3. Then, you must click More.
#4. After that, let’s press Cancel return.
#5. Finally, to confirm, click Cancel return in the dialog box.
What’s more, if you are not proficient of coding knowledge, all you need to do is to hire a reputable Shopify partner to help you solve everything to make sure your site always work well. And, choosing Arrowtheme with our Shopify website packages is the wisest choice for you.
Our packages come with not only Shopify development services, Updates services but also Maintenance & Support services. In particular, we are running a discount program up to 30% off for your project. Hence, grab this great deal right now!
How To Create A Shopify Refund?
Refunding an order means you have to return payment to the buyer. You can refund the entire order or only a portion of it. What’s more, you also can refund an order without making a return, but you won’t be able to return it once it’s been issued. In rare cases, you may be able to cancel an order and receive a refund.
In addition, you have the option of restocking the items and sending a notice email to the consumer as part of the refund procedure. Furthermore, you can replenish the items from the order if there is no payment to return.
For more detail, in case you make a refund with Shopify Payments, the amount is removed from your next available payment. In particular, with anyone who’s using Shopify Payments and the payout doesn’t have enough funds for a refund, the results will vary depending on their location. Specifically, for stores in the following cities:
- The remainder of the refund is taken from the following payout until the refunded amount is reimbursed in Austria, Denmark, Germany, Hong Kong, Ireland, Italy, Netherlands, Singapore, Spain, Sweden, New Zealand, and the United Kingdom.
- The balance is debited from your bank account on the day of the payout in the United States, Canada, and Australia.
Furthermore, it can take up to 10 business days for a refund to be credited to your customer. If a payment for a negative balance fails, the payout is attempted again in three business days. In addition, in case you use Shopify POS to return an order to store credit, you can afterwards refund the amount to the original payment method.
Not only that, you may not be able to issue a refund if your Shopify Payments account has a negative balance. Refunds are marked as Pending until you’ve made enough sales to have a positive balance in your Shopify Payments account, at which point you’ll be able to issue them successfully.
Way To Refund A Shopify Entire Order
Simple Instruction To Refund An Entire Order on Desktop
#1. First of all, navigate to Orders in the Shopify admin.
#2. In order to refund an order, click on it.
#3. Then, select Refund.
#4. Enter the number of refunded products in the order.
The Shopify Refunds total amount is updated, less any delivery charges, rather than the Total available to refund amount. If you wish to charge your customer a restocking fee, for example, you can manually change the refund total. You can also include a refund for any shipping fees that may have been incurred.
#5. In the Shipment section, enter the amount you want to reimburse for shipping. (optional)
#6. Then, uncheck Restock items if you’ve despatched the items but your buyer hasn’t returned them yet. This checkbox appears only if you’re keeping track of inventory for the products in the order.
#7. Enter a rationale for the refund if desired. (optional)
#8. After that, uncheck Send a notification to the customer if you don’t want to send an email to your customer when you give a refund. By default, this option is enabled.
#9. Finally, to cancel the customer’s order, let’s click Refund.

Simple Instruction To Refund An Entire Order on iPhone
#1. First of all, you have to tap Orders on the Shopify app.
#2. Click the order you’d like to cancel.
#3. Then, tap Refund payments from the order details screen.
#4. To input the quantity sold, click the + beside each line item.
#5. Disable the Restock option if you don’t want the items to be returned to inventory.
#6. (Optional) To include the cost of shipping in the refund, use the Refund shipping option.
The number in the Total column and the quantity in the Available to refund field should now be the same.
#7. (Optional) Then, you can enter a rationale for the refund if desired.
#8. (Optional) If you want to send the customer a refund confirmation email, you can
enable the Notify customer via email option.
#9. Choose Refund.
#10. If you’re certain you want to cancel the order, press Refund to confirm your decision.
Guide To Refund Part Of An Entire Order on Android
#1. To begin, tap Orders on the Shopify app.
#2. Click the order you’d like to cancel.
#3. Then, tap the button ⋮ from the order details screen.
#4. Click Refund order
#5. After that, in order to input the quantity sold, click the + button next to each line item.
#6. Disable the Restock returned items option if you don’t want the items to be returned to inventory.
#7. (Optional) Let’s use the Refund shipping option if you want to include the cost of shipping in the refund.
Besides, the number in the Total column and the quantity in the Available to refund area should now be the same.
#8. (Optional) You are able to type the reason for refund or not.
#9. (Optional) Also, if you don’t want to send a refund confirmation email to the consumer, disable the Notify customer via email option.
#10. Then, press Refund.
#11. Finally, if you’re certain you want to cancel the order, press REFUND to confirm your decision.
How To Refund Part Of An Order?
Coming to the method to refund part of an Shopify order, you will have the option of issuing a partial refund for individual goods in an order. You can then issue more partial refunds until you’ve reached the maximum amount you can refund, which is the order’s original cost.
When you do a partial refund on a customer who paid with a gift card and another type of payment, the refund is credited to the gift card first, until it reaches the full amount available for reimbursement. The remainder of the refund is then applied to the other ways of payment.
Additionally, you can manually alter the refund amounts for each payment type up to the allowed amount for each payment method. If a partial refund of $50 is applied to the gift card but only $20 may be applied to a credit card, you could split the refund by putting $30 to the gift card and $20 to the credit card.
Guide To Refund Part Of An Order On Desktop
#1. To start, go to Orders in your Shopify admin.
#2. To refund an order, select it
#3. Then, click Refund in the Order Details section.
#4. Enter the number of items you’d like to return and the amount you’d like to be refunded. Any items having a quantity of 0 will not be reimbursed.
The Refund amount is updated, less any delivery expenses (not the Total available to refund amount). Besides, you can change the amount manually. Not only that, you can also include a refund for any shipping fees that may have been incurred.
#5. (Optional) In the Shipment section, enter the amount you want to reimburse for shipping.
#6. After that, you have to uncheck Restock items if you’ve despatched the items but your buyer hasn’t returned them yet. This checkbox appears only if you’re keeping track of inventory for the products in the order.
#7. (Optional) Enter a rationale for the refund if you want.
#8. Finally, to get a refund for the things you’ve chosen, click Refund to complete.
Simple Instruction To Refund Part Of An Order On iPhone
#1. First of all, you have to tap Orders on the Shopify app.
#2. Click the order you’d like to cancel.
#3. Then, tap Refund payments from the order details screen.
#4. Enter the amount you want to refund using the – and + buttons beside each line item. No refunds will be given for items having a quantity of 0.
#5. (Optional) If you don’t want the refunded products to be returned to inventory, switch off the Restock toggle button.
#6. (Optional) Moreover, to include the cost of shipping in the refund, utilize the Refund shipping option.
When you make your selections, the Total field updates, and the total is less than the total in the Available to refund field.
#7. Enter a rationale for the refund if desired. (Optional)
#8. (Optional) You can send the customer a refund confirmation email if you enable the Notify customer via email option.
#9. Then, click Refund.
#10. Finally, if you’re certain you want to cancel the order, press Refund to confirm your decision.
Quick Guide To Refund Part Of An Order On Android
#1. Firstly, click Orders on the Shopify app.
#2. Then, let’s tap the order you’d like to cancel.
#3. Click the ⋮ button
#4. Then, press Refund order
#5. Enter the amount you want to refund using the – and + buttons beside each line item. Items with a quantity of 0 are not eligible for a refund.
#6. If you don’t want the refunded products to be returned to inventory, switch off the Restock toggle button.
#7. (Optional) To include the cost of shipping in the refund, use the Refund shipping option.
When you make your selections, the Total field updates, and the total is less than the total in the Available to refund field.
#8. (Optional) Enter a rationale for the refund if desired.
#9. (Optional) In case you don’t want to send a refund confirmation email to the consumer, disable the Notify customer via email option.
#10. After that, click Refund.
#11. The final step is pressing Refund if you’re certain you want to cancel the order.
The order information screen shows that the order has been partially reimbursed. If you issue another refund to the order at a later time, the total amount available for refund will be reduced.
How To Minimize Shopify Refunds And Returns?
Nowadays, instead of feeling scared of online shopping like before, people are increasingly turning to online purchasing since it is quick, simple, and convenient.
Purchasing things online or through mobile apps is a fairly uniform process regardless of what you’re buying. In particular, whether you’re buying anything, the process will be nearly identical. For more detail, you start with a Google search to identify the proper website, then select the product you want to purchase, and then complete the purchase.
Because of the popularity of this method, more shops are turning to the Shopify platform, which offers customers an easy and smooth buying experience. No one, especially Shopify retailers, enjoys dealing with Shopify returns or refunds. More importantly, because Shopify doesn’t have any built-in refund or return capabilities, the entire procedure will cause other issues.
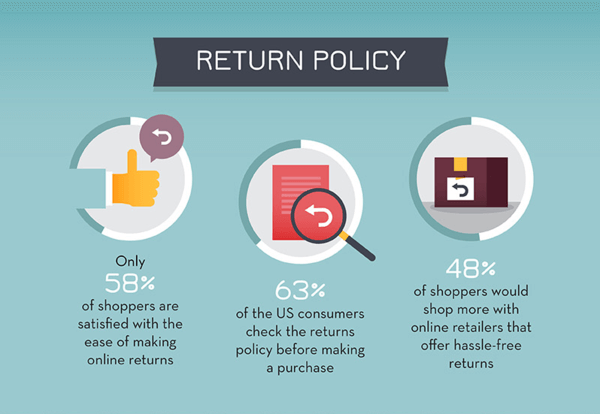
Moreover, returns and refunds are, in all honesty, even more complicated than purchases. This is because each product category has its own set of laws and procedures for returns. Despite this, most Shopify merchants suffer a common issue: an increase in the rate at which their products are returned. Additionally, the Wall Street Journal reports that around 33% of things purchased online are returned.
In conclusion
All in all, Arrowtheme hopes through this blog, you can acquire a lot of helpful information about Shopify refunds and returns. Hence, you can apply them to your Shopify online store effectively.
Aside from this topic, you should refer to other Shopify tutorials such as:
Contact US – ArrowTheme:
– Email: [email protected]
– Facebook: Facebook.com/ArrowThemeTeam
– Website: ArrowTheme.com